
Berthon’s history with the Motor Gun Boats (MGB) and Motor Torpedo Boats (MTB) goes all the way back to 1939 when numerous MGB and MTB hulls and complete boats were built or fitted out at our boat yard during World War Two. This adaptable hull design allowed the vessel to be converted between a torpedo and gunboat variant depending on upcoming missions.
As well as this history, Berthon’s experience was a key factor in MGB81 being restored at our shipyard. Berthon’s traditional shipwrighting knowledge in restoring and refitting boats at our state of the art facilities is unrivalled in the UK, coupled with our award-winning apprenticeship scheme ensures these skills are also passed on to the next generation.
Berthon was awarded the contract by Portsmouth Naval Base Property Trust for the restoration and re-engining of the famous Motor Gun Boat 81 (MGB81) funded by the Chancellor using LIBOR funds.
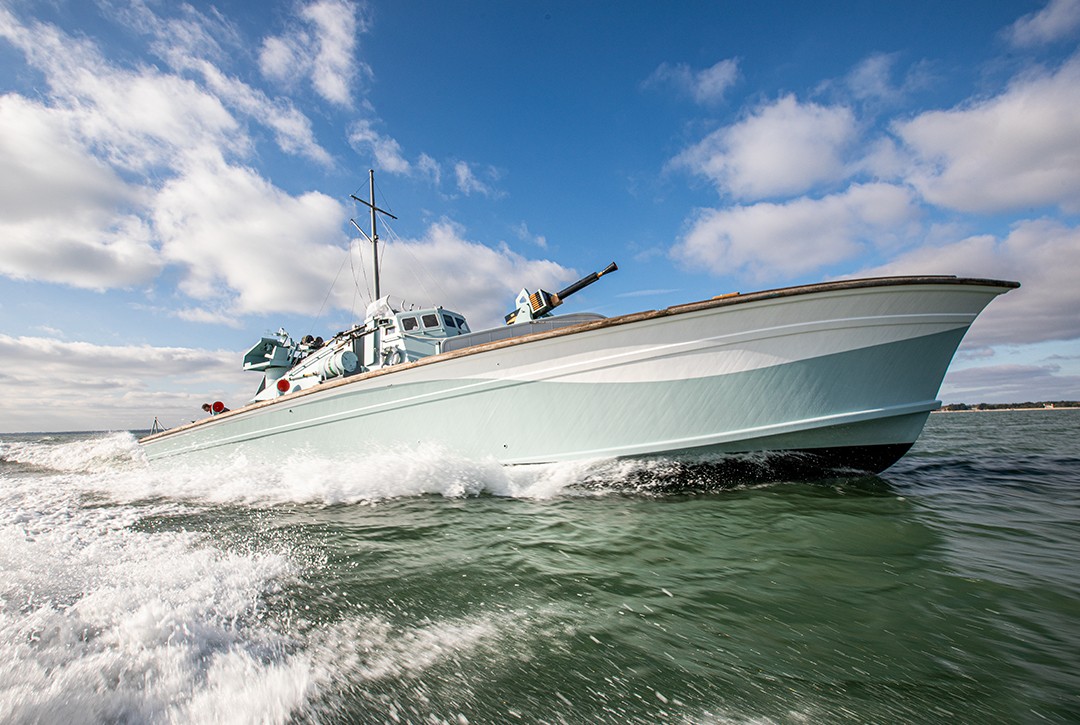
MGB 81 is a 71.5ft Motor Gun Boat built by the British Powerboat Company for the Royal Navy and launched on 26 June 1942. When built, she was among the fastest boat of her type in the world and capable of speeds in excess of 42 knots. MGB 81 and her sister vessels were involved in the action in the English Channel, attacking enemy torpedo boats and landing secret agents on occupied soil. She was later involved in D-Day operations. MGB 81 is unique as she is the only restored and operational example of a Royal Navy Coastal Forces MGB which saw active service in WW2. As a result of the restoration techniques used, she retains most of her original performance capabilities but is stronger, lighter and require less maintenance.
The refit stripped her from stem to stern, and replaced the structural frames and longitudinal stringers in pairs so as to safeguard the original hull and fittings and keep it as original as possible. One of the largest jobs included replacing the 3 MAN 835hp engines with 3 new, Mermaid Marine supplied, FPT C13 825hp diesel engines. Both Berthon and the PNBPT wanted to keep MGB 81 as original as possible. However, the replacement engines are more reliable, fuel efficient and lighter than the originals.
MGB81 VIDEOS


Restoration
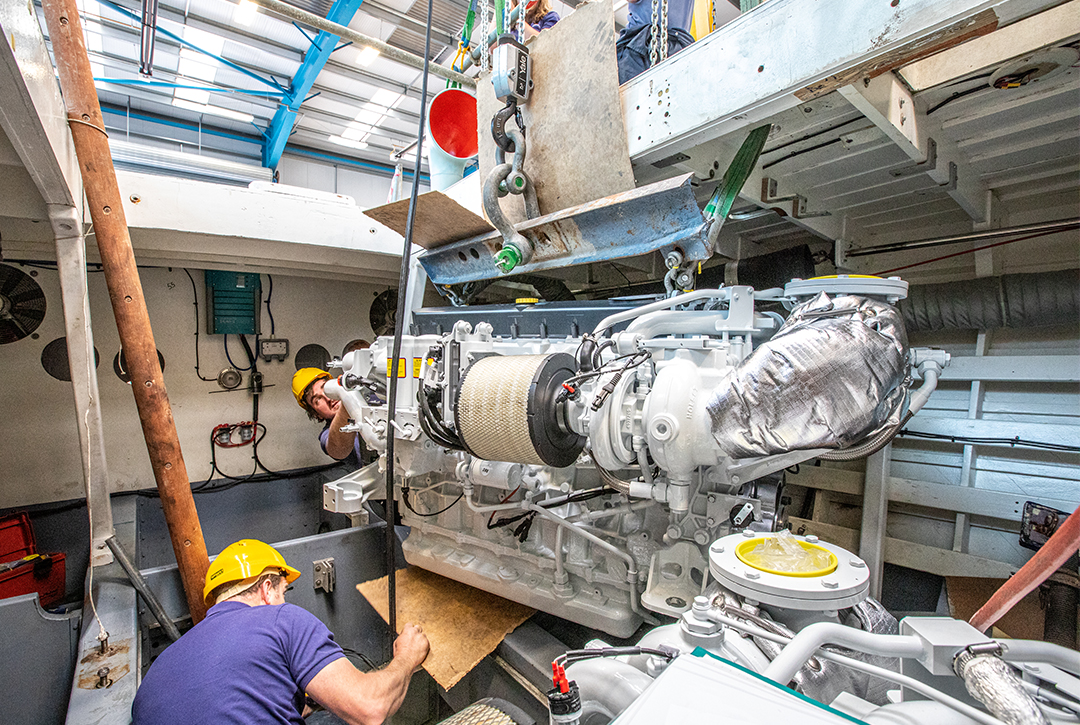
Engine Removal
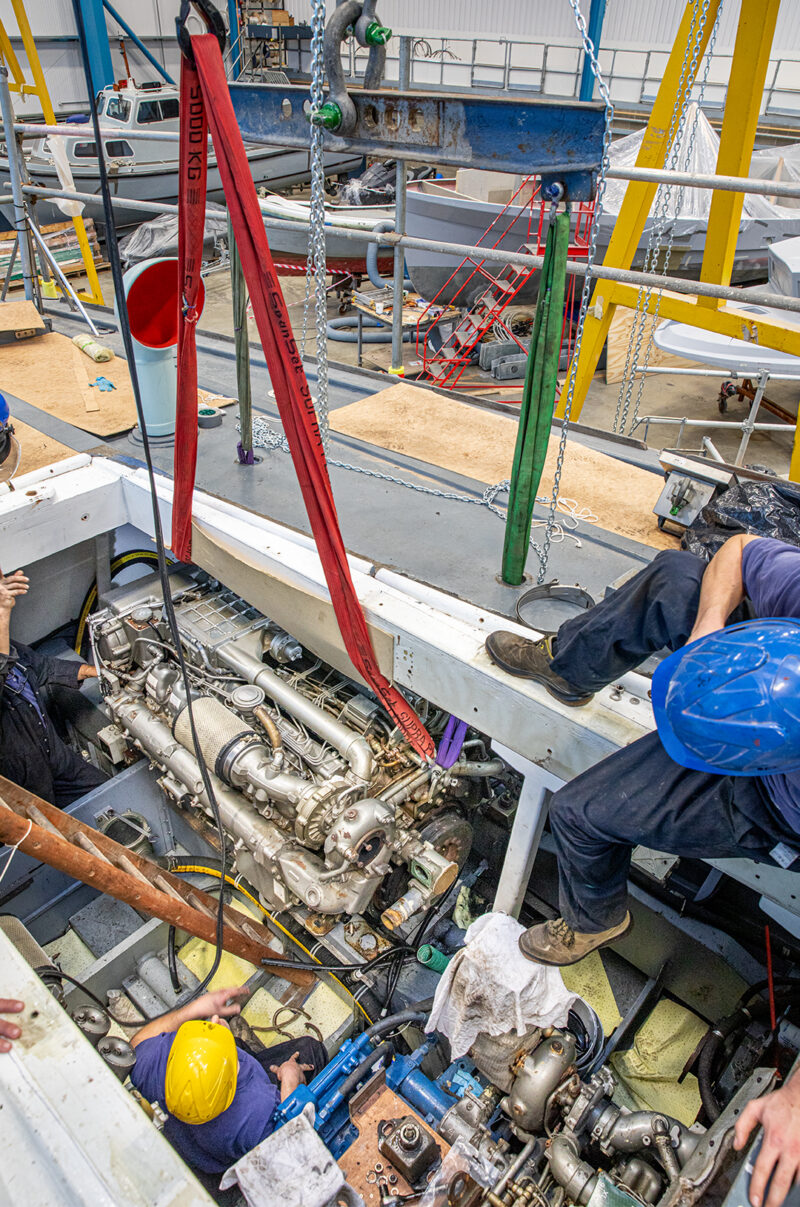 3 MAN 835hp engines were removed to make way for 3 new, Mermaid Marine supplied, FPT C13 825hp more reliable, fuel efficient, and lighter diesel engines.
The entire aft superstructure, including replica twin 20 mm Oerlikon cannon and turret had to be removed, revealing a soft patch large enough for the engines to fit through.
With the aft superstructure safely stowed , Berthon engineers dismantled six exhausts and supporting brackets, the aft generator (which had been hidden in the stern from when she was a house boat), drive shafts for the port and starboard engines, prop shafts and props from all three engines, battery banks and the mid ship gear box (as this was mounted directly to the engine without a drive shaft); exhaust fittings and oil filters followed to enable the engines to be drained of all fluids reducing weight and prevent an unsafe lift before stowing them adjacent to the boat..
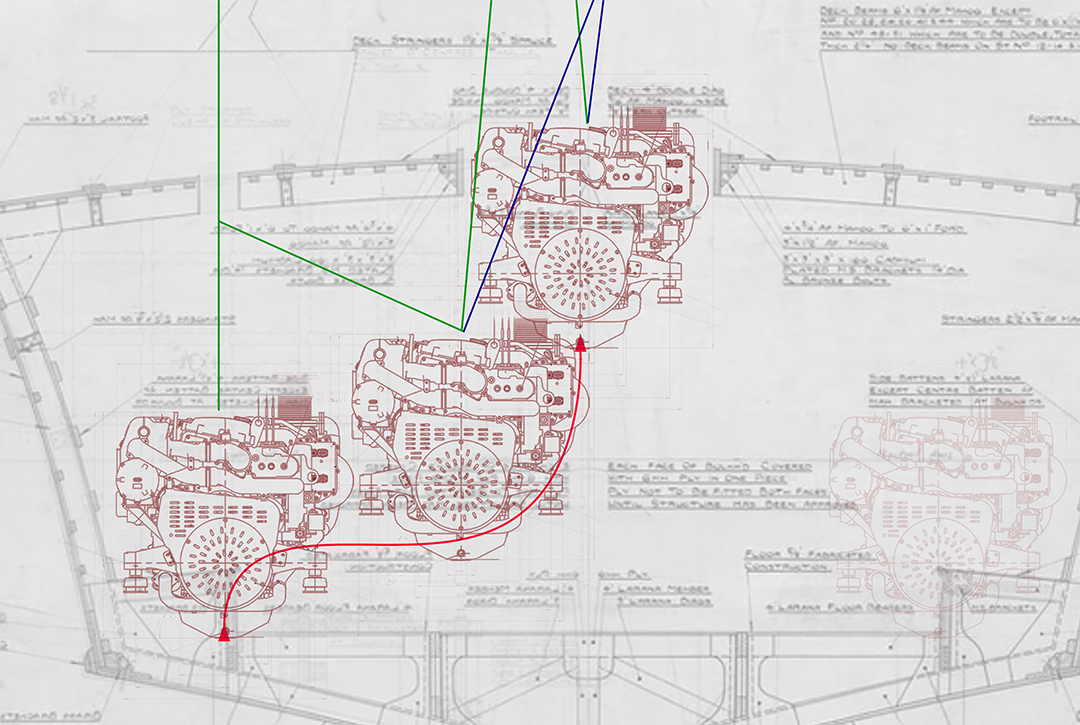
Two cranes were used to lift each engine out, one to lift the 1,900 kilogram engine high enough so that the sump would clear the engine supports, and the second to swing it into place before being lifted out. This intricate process involves patience and careful coordination as per the diagram below (or view the video coverage) And prior to the final lift and drop to shed floor level the first strop was reattached to the engine to act as an additional safety line.
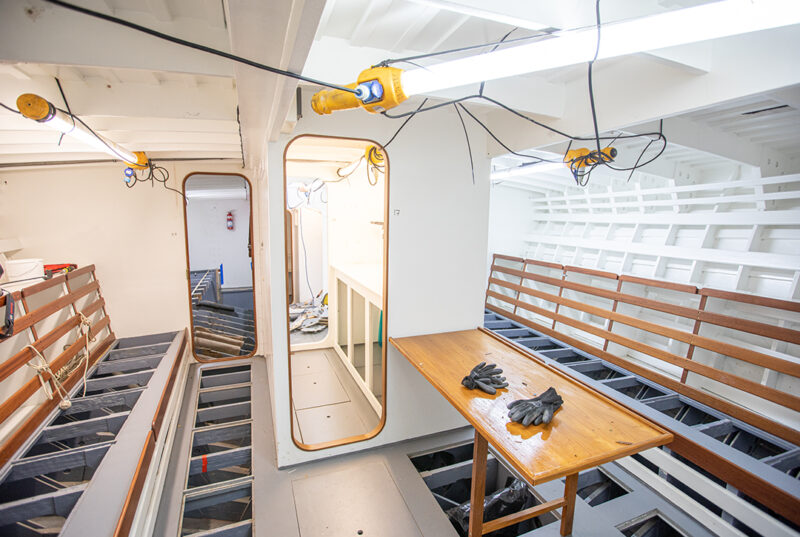
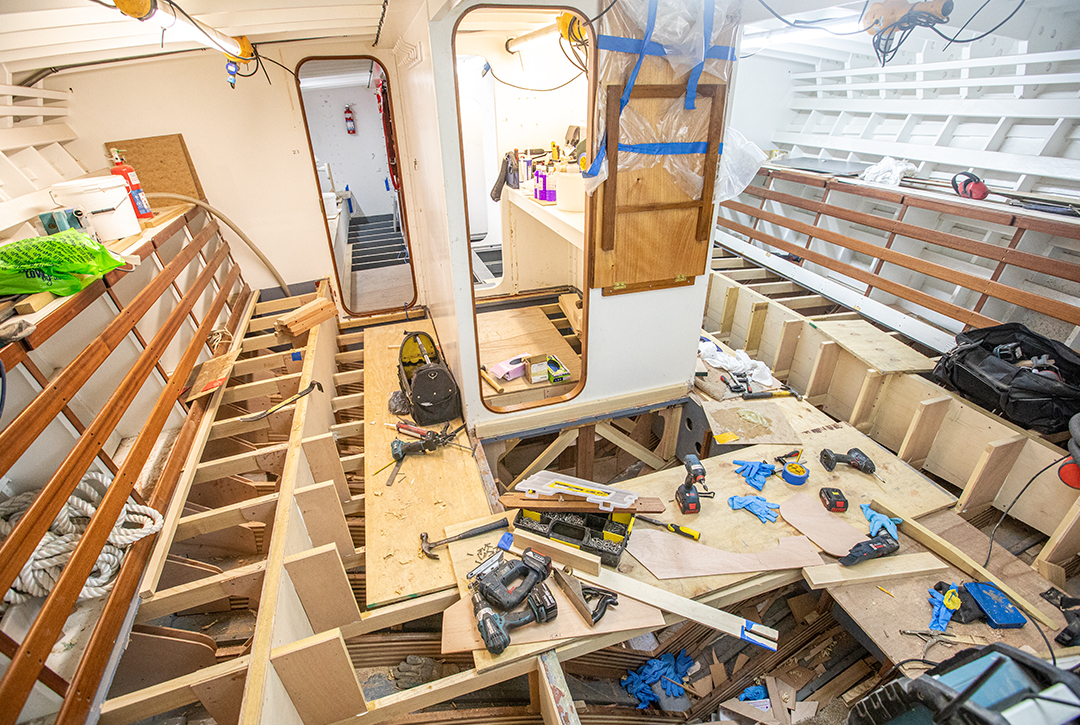
Removal of Interior
Before any of the work could begin all removable panels, ie bunk tops and floor panels, were dismantled and stored; this exposed the delamination of the frames. To gain access to these, the floor bearers and bunk supports had to be removed which included the outer longitudinal which was also the bunk front port and starboard.
Cengar jigsaws were used to remove the affected frames and a reciprocating saw was then used to cut the frames into shorter sections to make removal easier; mauls and lump hammers were the tools of choice to detach remnants. Unfortunately, there is no delicate way to remove these original but sadly partly rotten structures as everything was glued in place along with hundreds of ring nails and screws.
With the frames removed there were still sections of plywood biscuits still attached to the topside frames, so these were carefully chiselled off in order to protect the 76-year-old mahogany diag hull planking. The screws and nails were subsequently cut off and ground flat before the hull was sanded and cleaned for the new frames to be added.
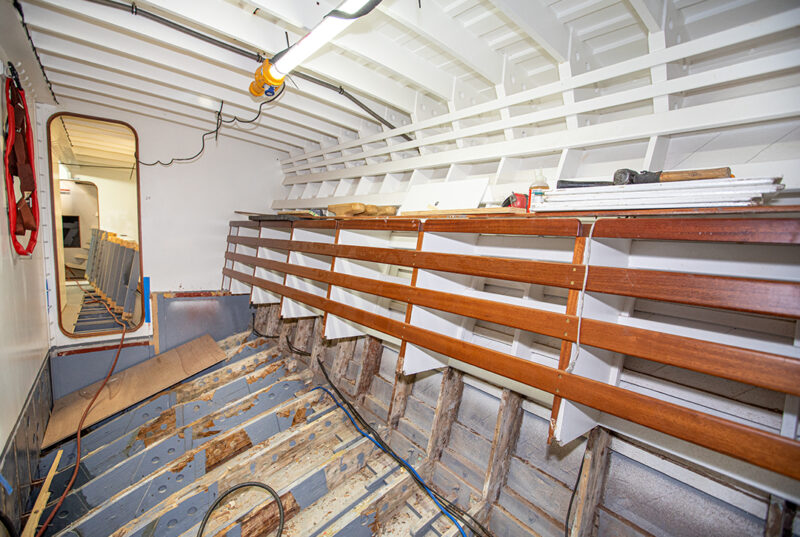
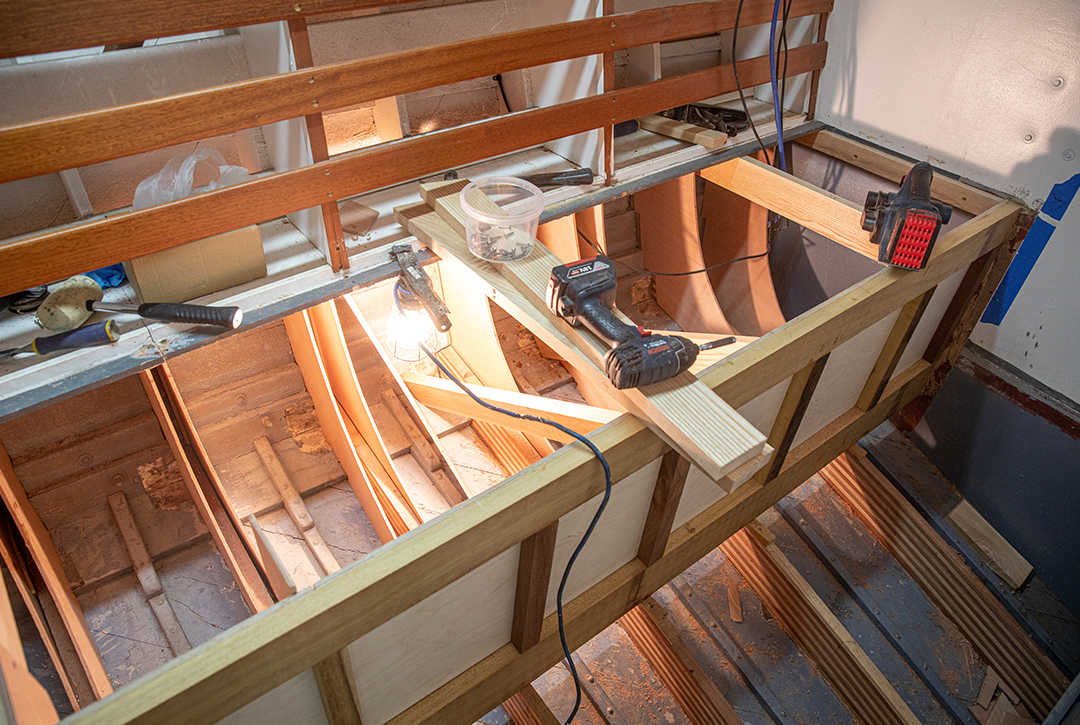
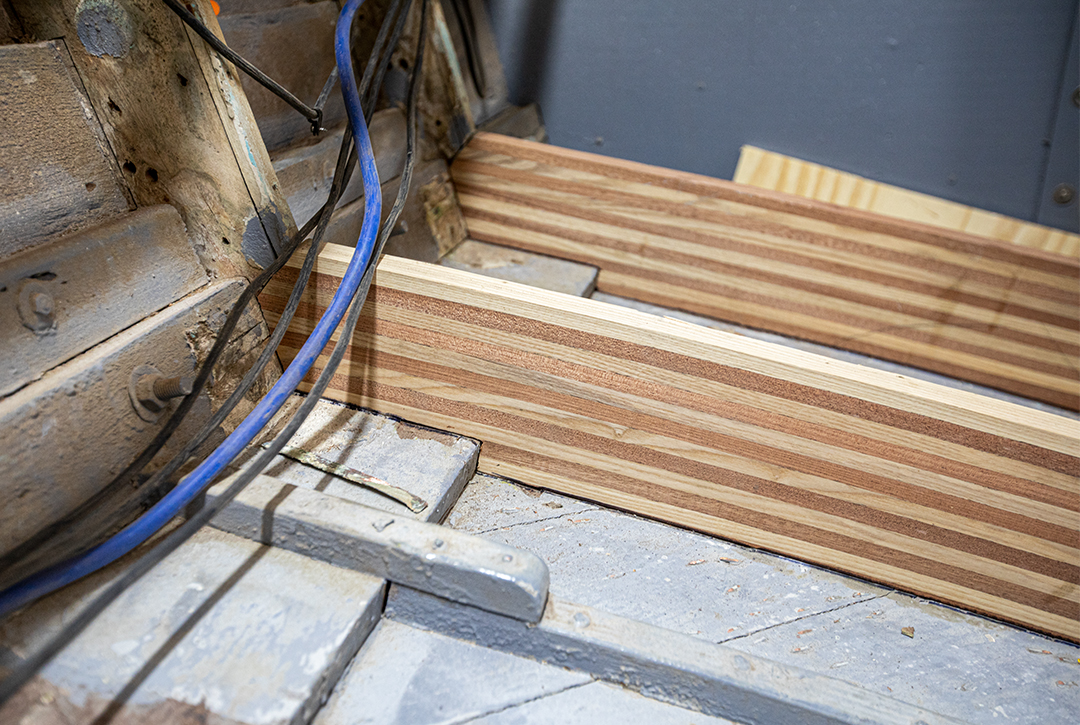
Hull Frames
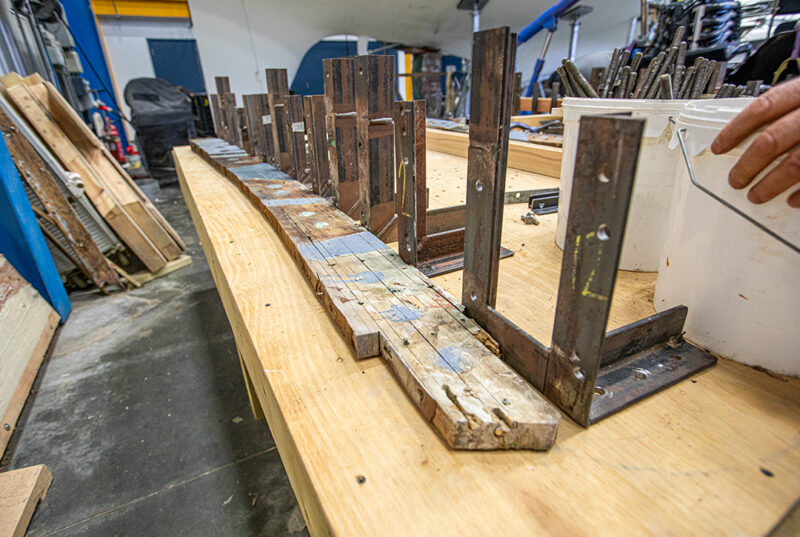
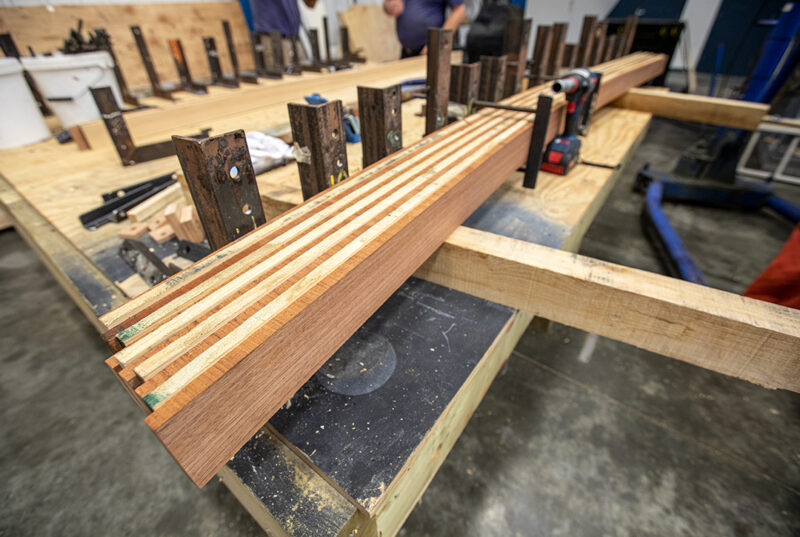
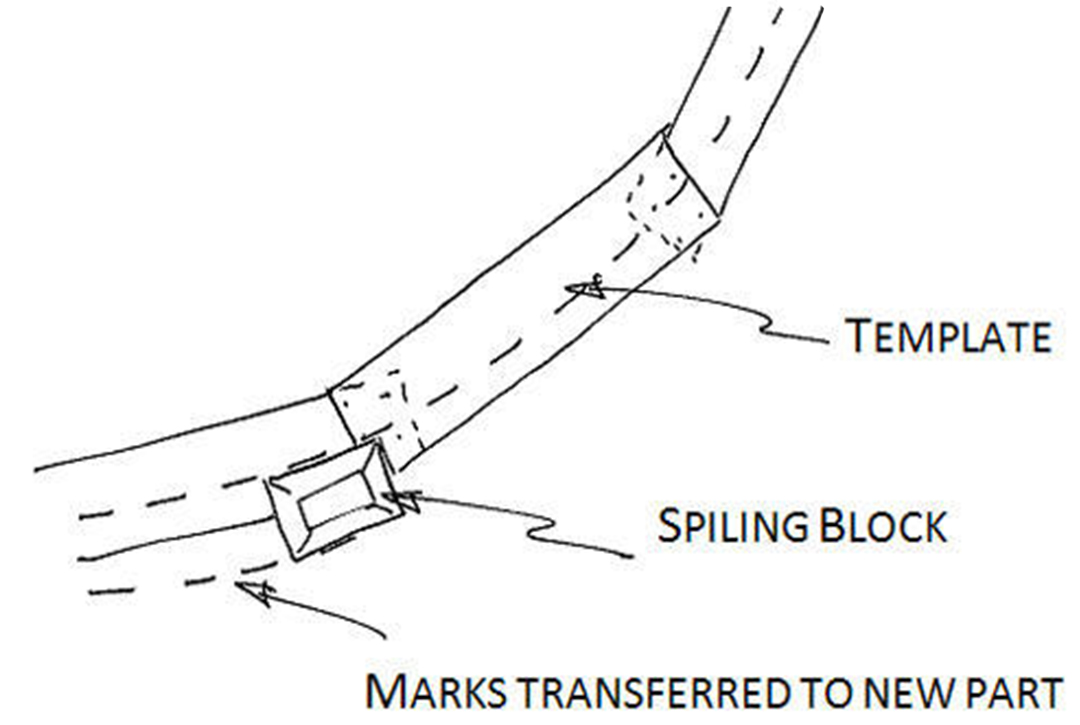
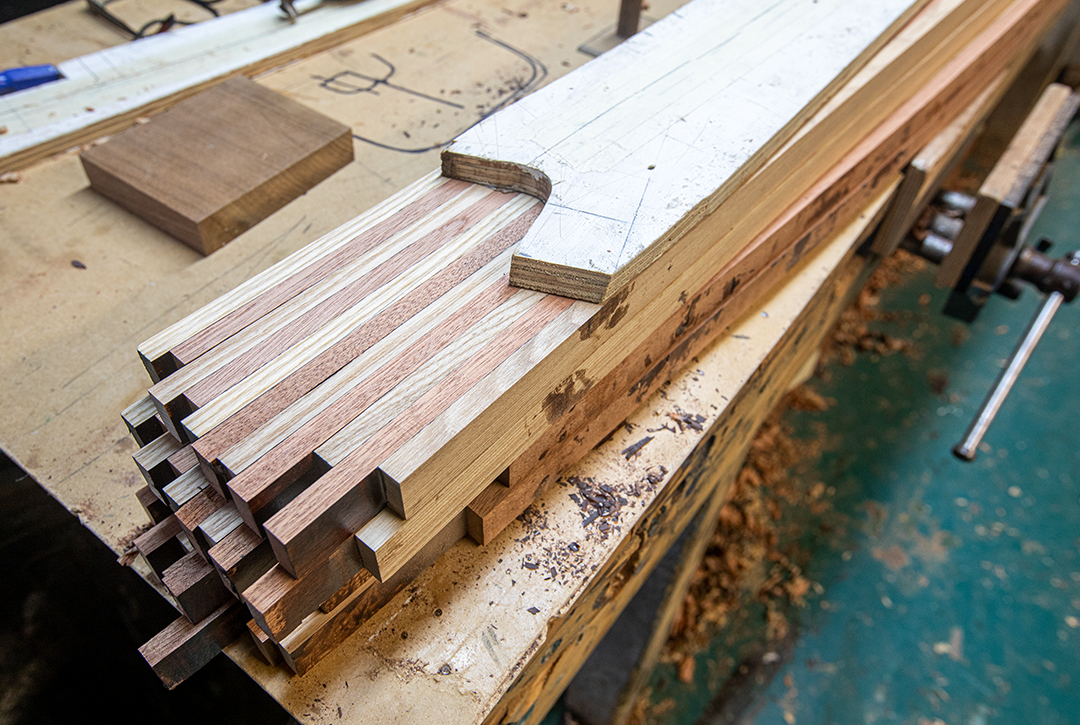
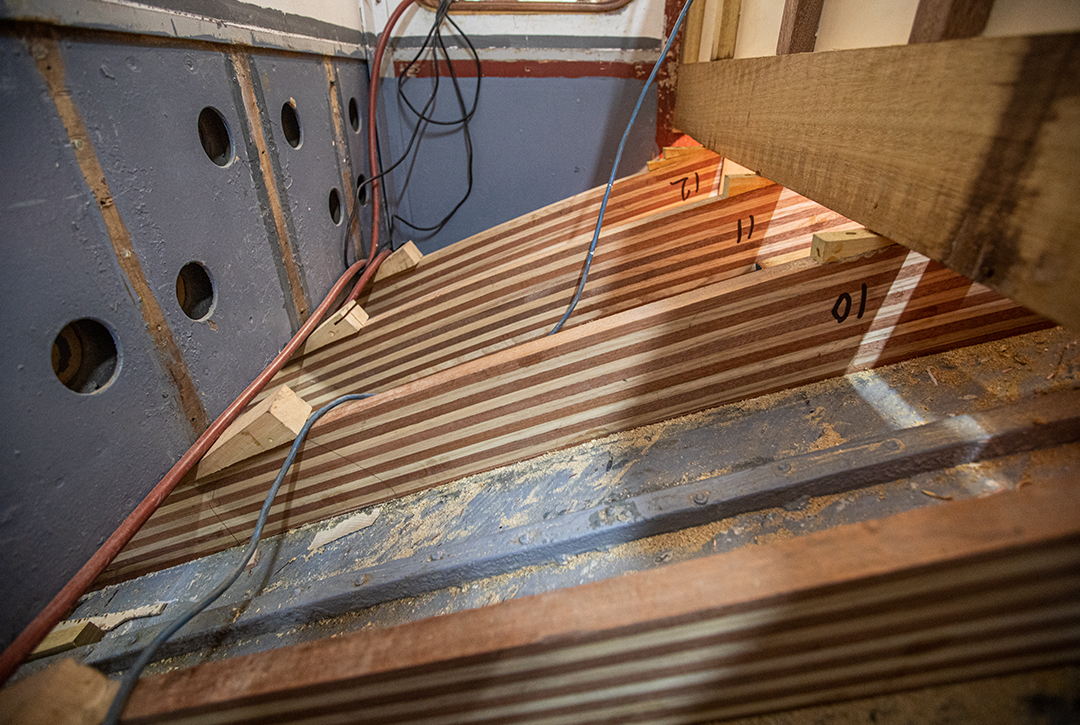
Each new frame is made up of 12 planks, made from a flexible, light ash and a heavier stronger utile (hardwood), these are glued together to make a strong and flexible frame. Every pair of frames is a different shape, as the curve of the MGB hull becomes more pronounced as it gets closer to the front. This meant that every time a new set of frames is laminated the jig has to be adjusted, even if it is only by a few millimetres. After the main shape has been formed a template is set up along the original beams’ position, and a more accurate shape is taken. This is done with a spiling block.

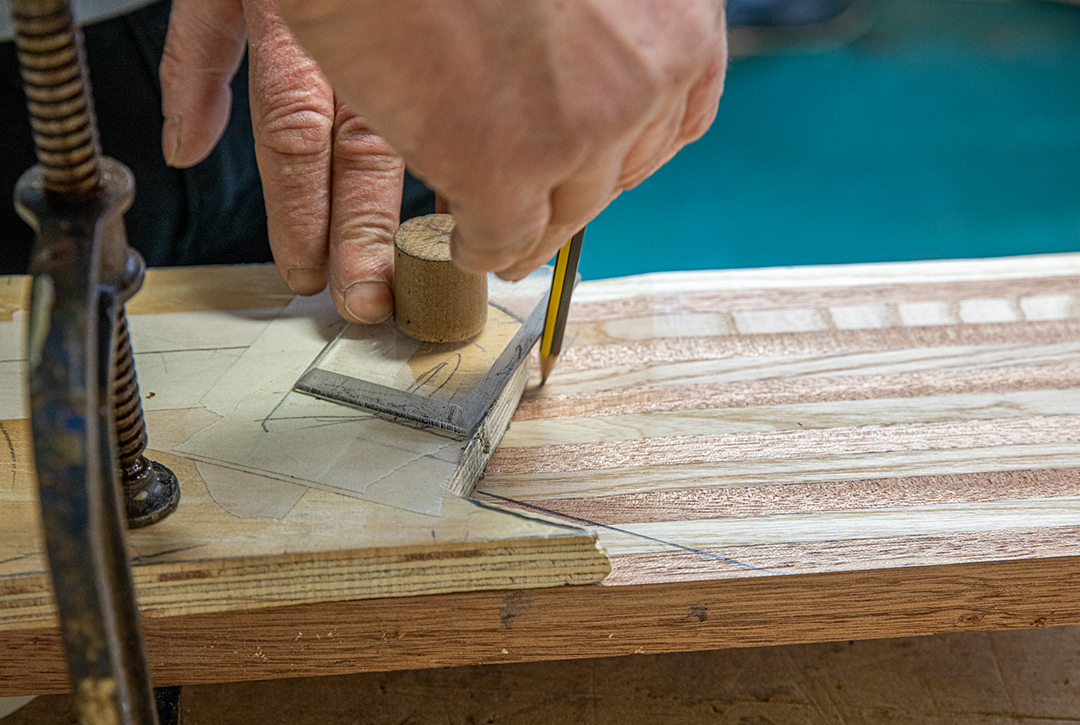
Spilling
Spiling can be an art form in itself. It is generally used in carpentry and shipbuilding, when the dimension is taken from a straight line, a mould’s edge or rule staff, to any given side or curve of a plank’s edge.
This is then placed in the jig and clamped in place to create the correct curve. Once it has had time to fully dry it is cut into two halves to form 2 individual and identical frames, one port and one starboard. This process is repeated 24 times to create the 48 new frames. This is a perfect teaching opportunity for our apprentices since spiling and making up laminated frames for old wooden craft is not an every-day ask in a modern boatyard.
The template is lifted off and laid out on the new timber to be cut, the marks are then transferred in reverse using the same spiling block. A continuous line using a fairing batten then joins these points.
When it comes to replacing an old plank or panel the most obvious way is to copy it by simply tracing around the old one. However, getting an old plank out without it breaking or distorting is much easier said than done. Especially one that is water damaged and rotten.
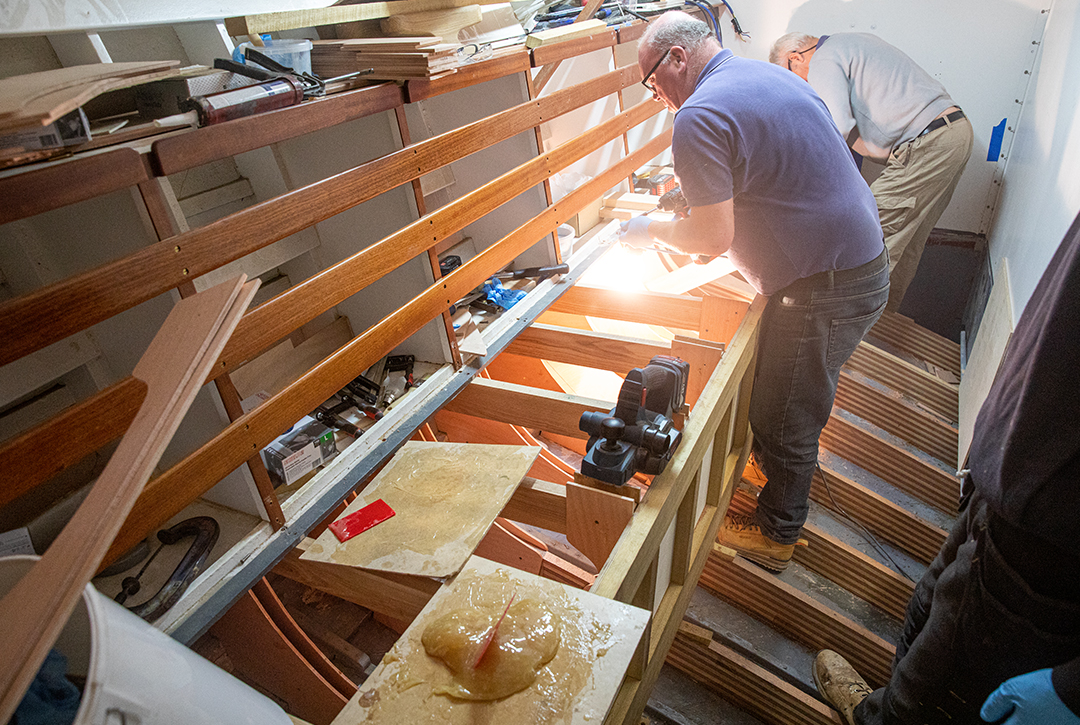
The new frame is then cut to shape and fitted into place in the original position. To get the perfect fit, as spiling is accurate but not perfect, the frame is finally planed in position until it is a seamless fit.When the team are happy with the position and fit of the frames, pilot holes are drilled through the hull every 8 inches following the line of the frame.
The beams are then dry fitted in place before being glued, clamped and wedged, with wooden pegs to prevent any slipping.
From the outside and using the previously drilled pilot holes for guides the frames are permanently screwed in place.
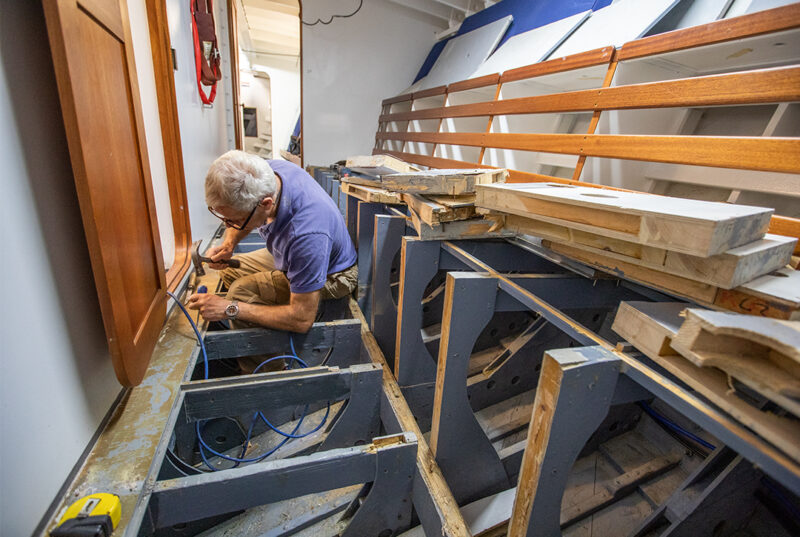
Bunk Fronts
These were glued onto the backs of the main bench frame frames, wedged from below with wooden pegs, in keeping with the way she has been finished throughout the entire boat, and finally screwed into place. The top was planed off for a smooth finish, ready for the bench tops to be added.

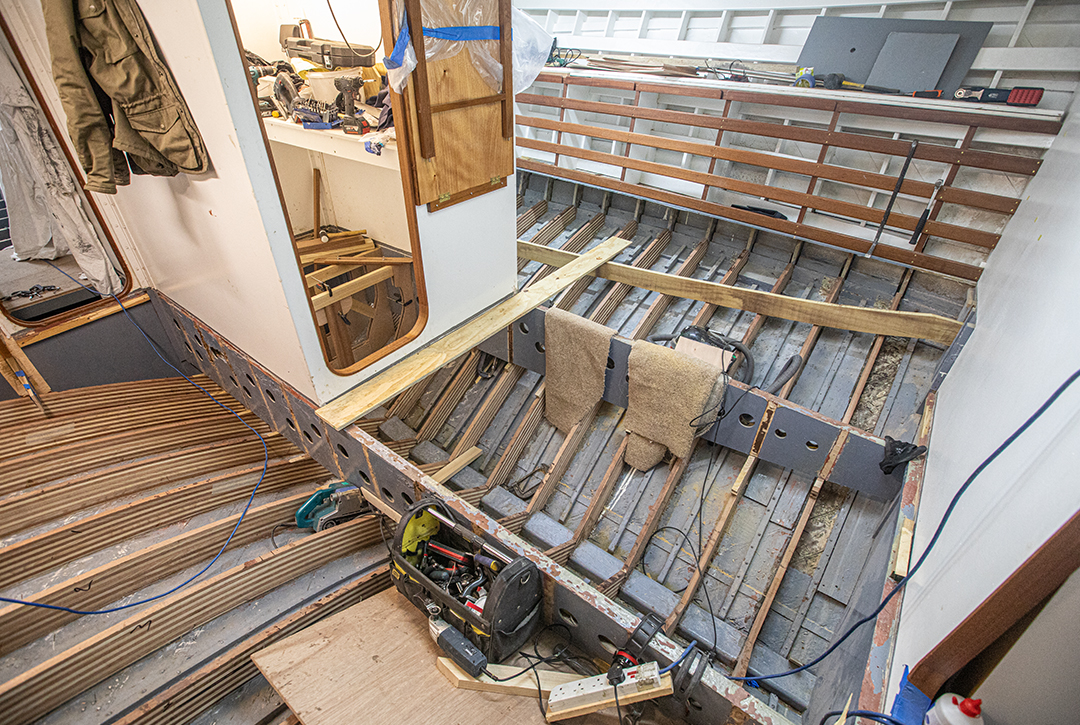
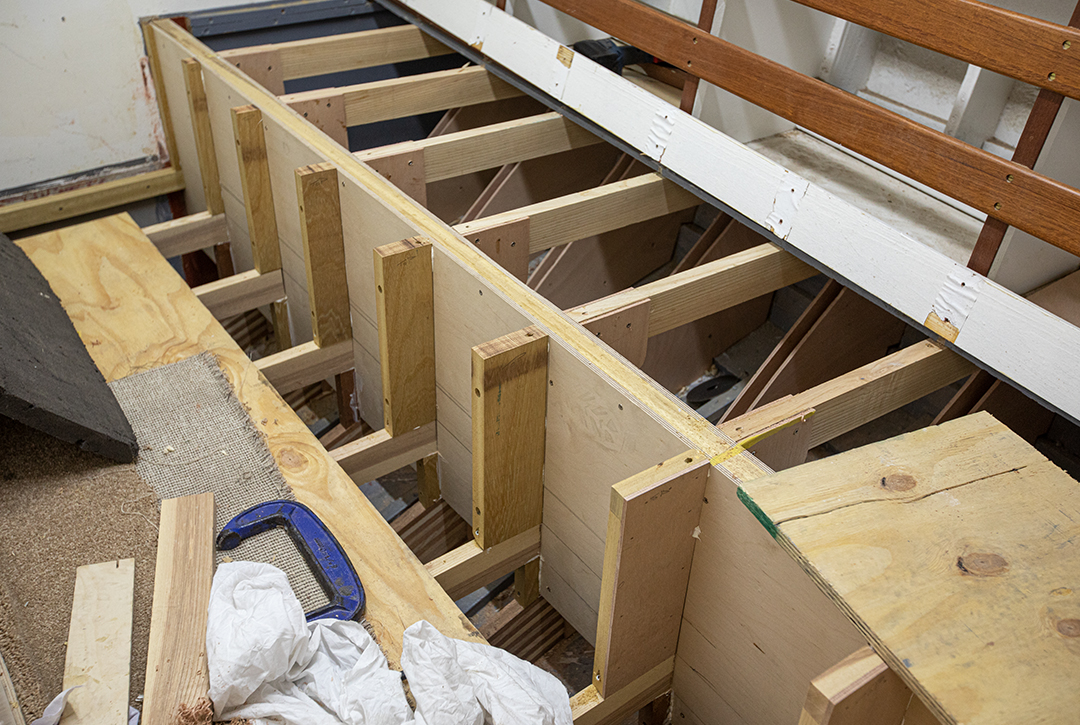
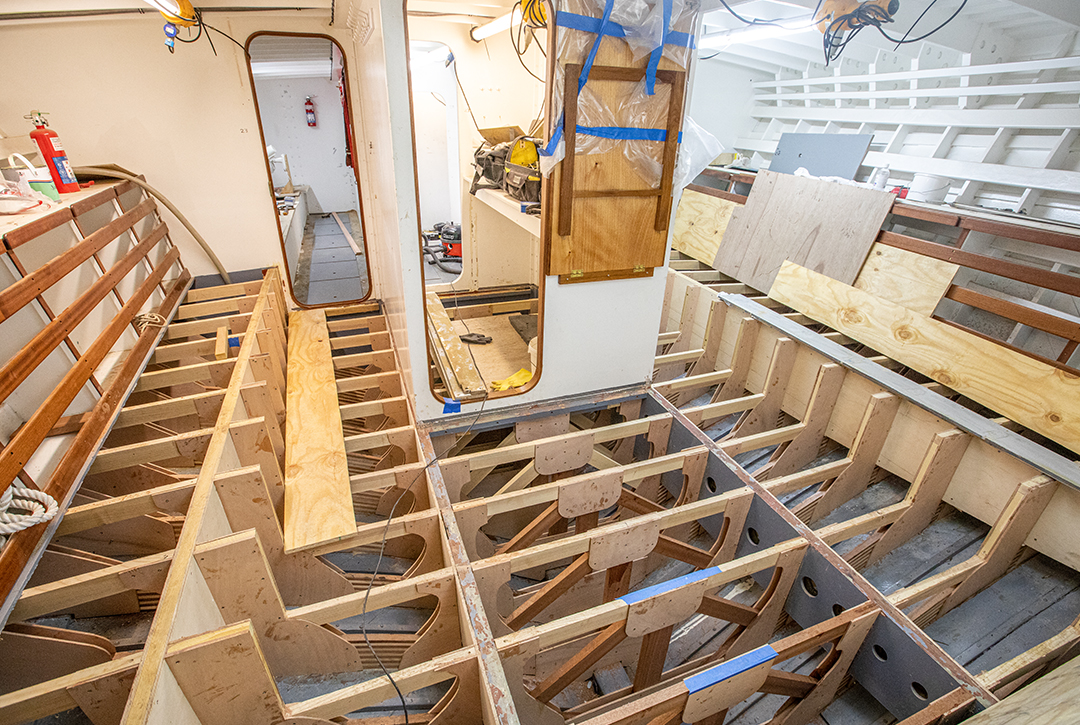
Uprights, Crossbeams & Webs to Create Structure, Shape & Flooring
The use of the plywood webs or stiffeners is to lock everything together; every corner or connection between two frames is reinforced with a web which has been glued and screwed into each frame. This pulls one to another and prevents any slipping along with stiffening up the entire structure and preventing anything from breaking or moving when she is up to speed and slamming in any swell.
When removing the original interior, a selection of each different web was carefully removed and saved in order to keep the pattern. These were replicated 300 times to create a new set, ready to be installed.
As with the frames, the webs were dry fitted and planed on site to create a perfect fit, as no 2 sets were the same – again due to the change in the hull’s angles.
The floor assembly was replaced in the same style with the structure and webs tying it all together. Rather than cutting the uprights for the main floor supports to sit flush with the angle on the hull beam below traditional methods were used. The wedges were glued into place and screwed down into the beam, the upright is then glued down and screwed through the bunk front into the structure behind. This creates a stronger support, rather than it sitting at a harsh 45° angle, it will all be square at 90°.

Forward
The entire forward Cabin was stripped out in the same way, apart from this time only 3 frames and the attached structure were removed at a time. This meant there was still space to move around and work without permanently working on an incline. It also prevents the hull shape from possible distortion.
Deck Repairs
The deck sheathing was sanded back and laminated, ready to be repainted at the same time as the vessel’s topsides, deck, hull and coach roof.
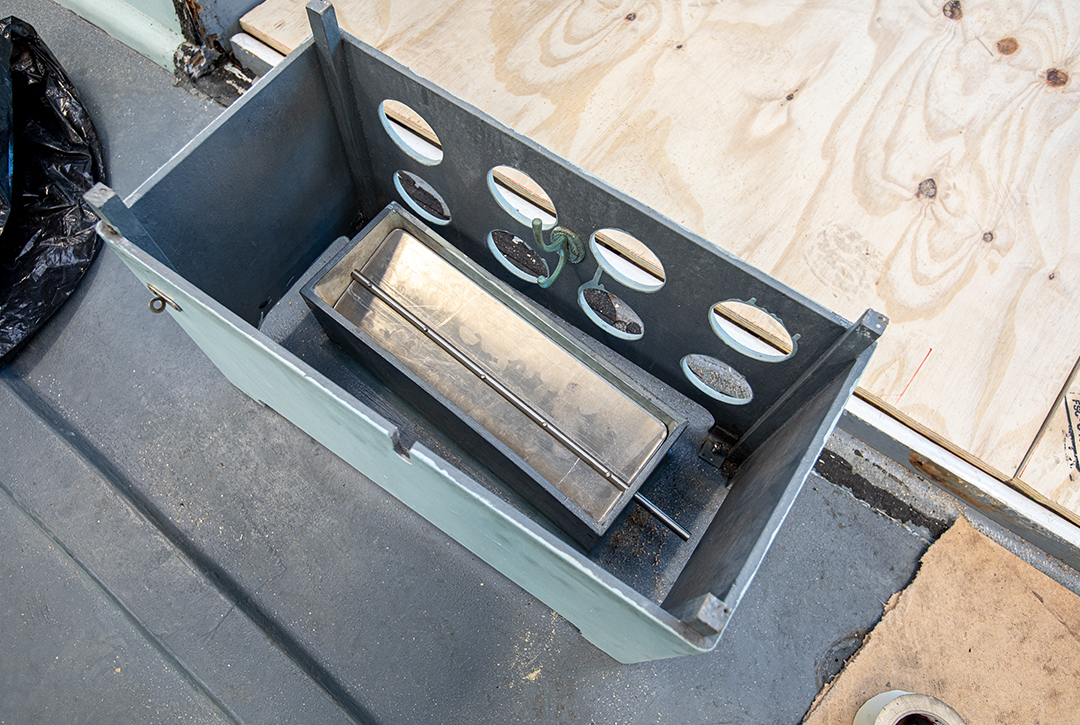
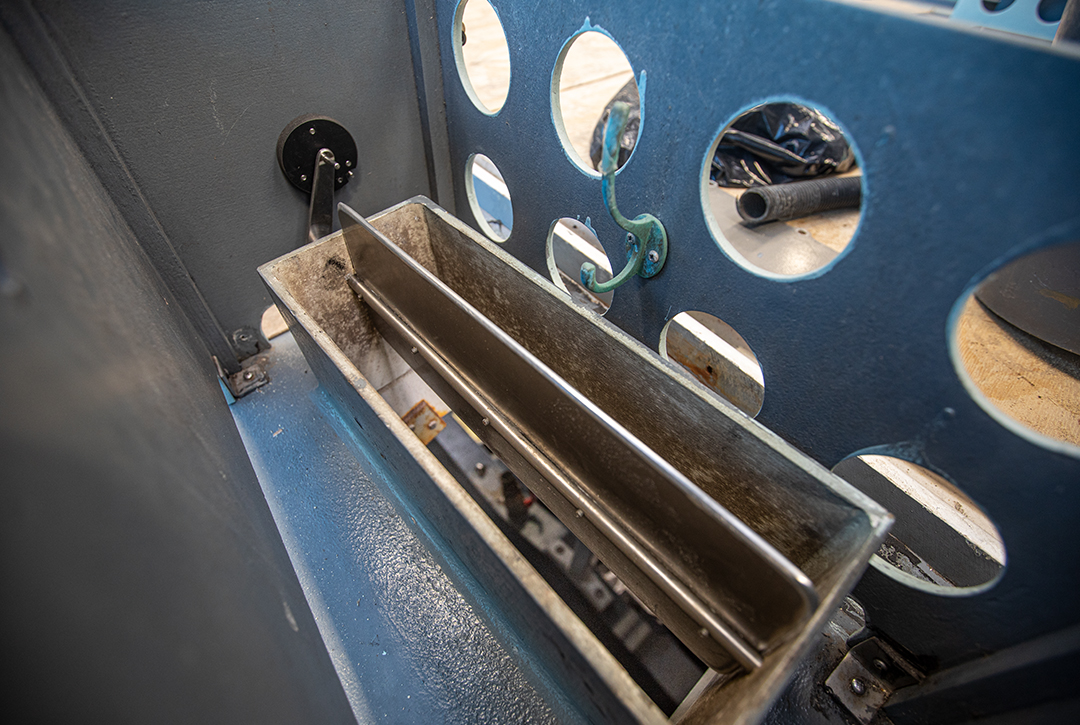
Engine room fire suppression flaps
Built inside the engine rooms ventilation covers are now simple yet effective fire flaps. With a quick pull of a pin, the handle will be released and the flap will close, cutting off all oxygen to the engine room.
New midship & forward frames
Each new forward frame is made up of 12 planks, made from a flexible, light ash and a heavier stronger utile (hardwood), these are glued together to make a strong and flexible frame. Every pair of frames is a different shape, as the curve of the MGB hull becomes more pronounced as it gets closer to the front. This meant that every time a new set of frames is laminated the jig has to be adjusted, even if it is only by a few millimetres.
With the centreline sole bearers and diagonals removed we could start making new templates of the forward webs, and begin fitting the forward frames. (In total 300 webs and 48 frames had to be cut, shaped and fitted into place)
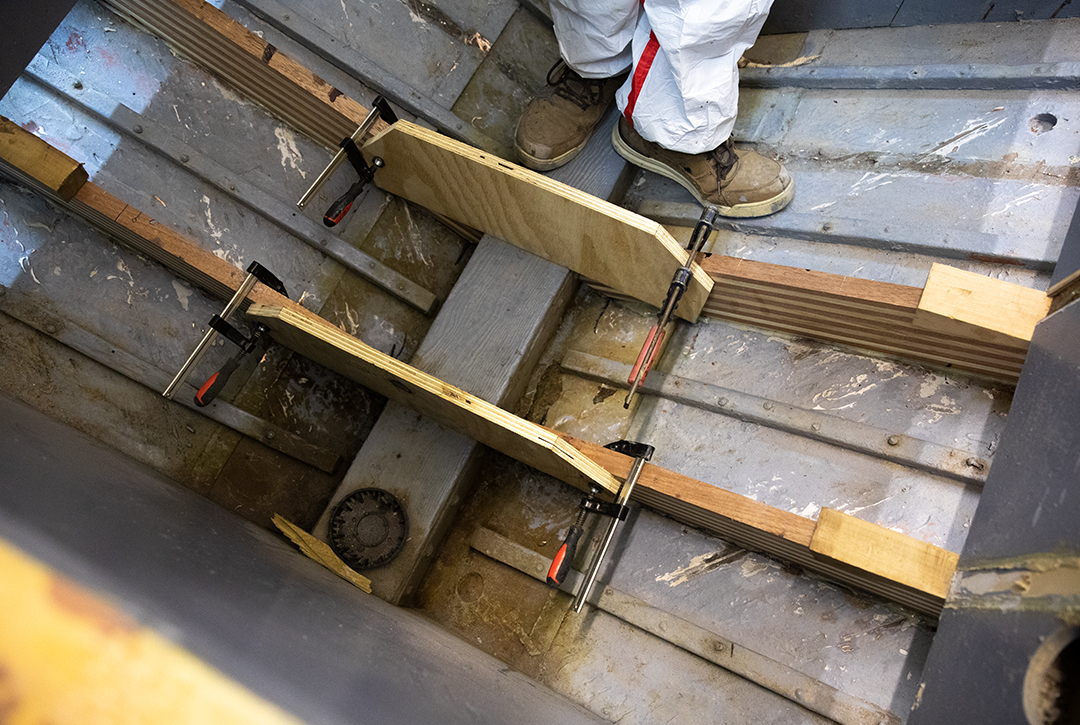
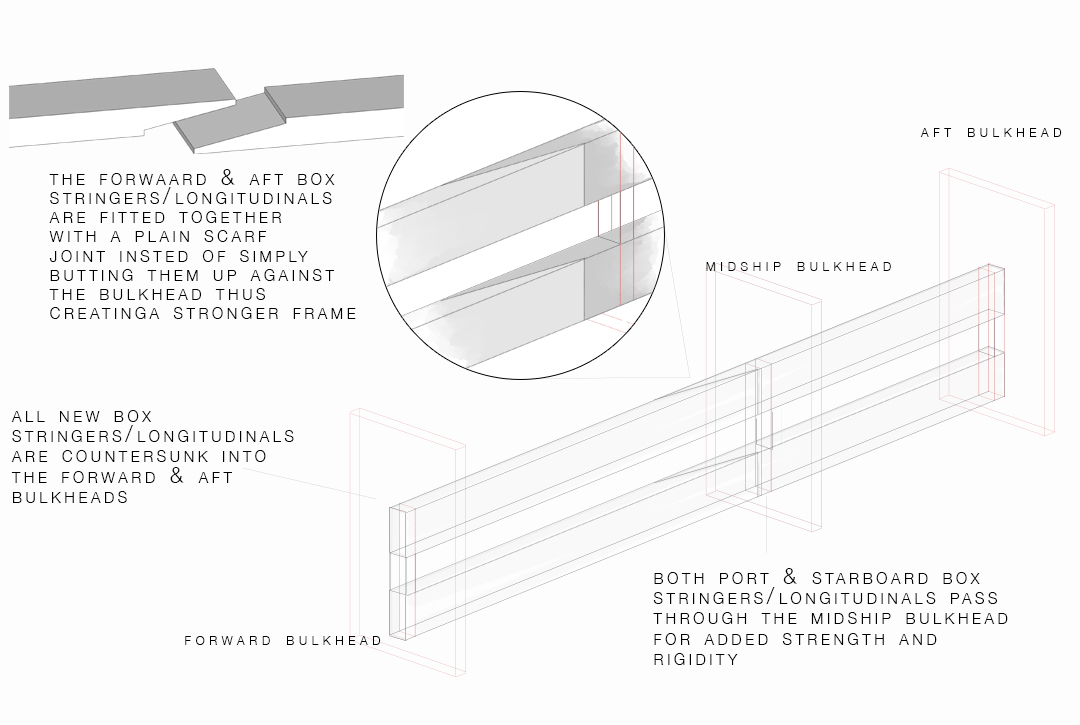
Forward box stringers/longitudinals
The existing longitudinals originally butted up against bulkheads and were glued and screwed through and fitted in place. We have now cut through the bulkhead and fitted each stringer together in the middle, with a scarf join, to make 4 longer 23’ foot stringers rather than 8 x 11’6” foot box stringers. The ends are set into the bulkheads and fitted in place. All of these changes will make her more structurally sound and far more rigid, hopefully negating the need for another refit soon. Quite clearly once a frame or two started to delaminate owing to excessive stress, others nearby then took the toll and the more movement there was the more frames became dislodged allowing moisture to wend its way into rot.
Uprights, crossbeams & webs to create structure, shape & flooring
Vertical uprights/groundwork were fitted to forward cabin longitudinal bunk fronts, in order to prevent the top longitudinal from sagging over time.
In order to attach the new structure to the original hull topside frames, plywood biscuits were fitted. These will work in the same way as all biscuits/webs and pull everything together.
A new structure of box section is fitted prior to attaching the inner plywood panel. These smaller structures will hold the original wooden fronts to the bunks.
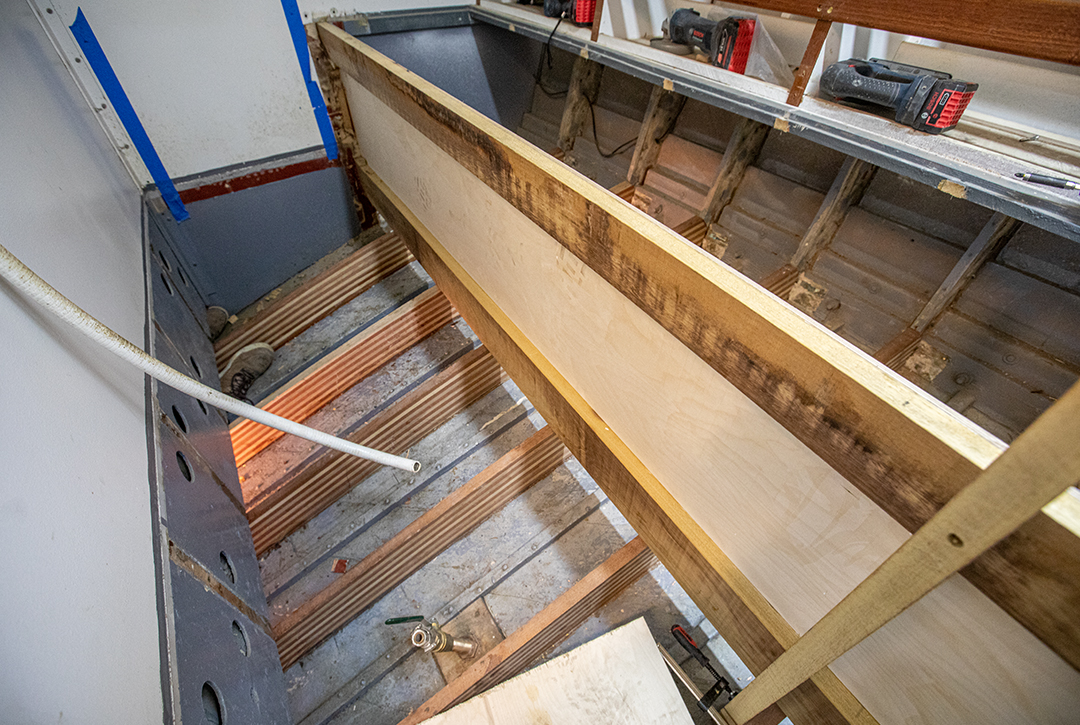
Finally, all of the new frames, diagonals, Longitudinals and deck beams were in place ready to be painted in the original blue/grey. One section, under a removable sole board, is unpainted and varnished. This way when it is back on show any visitors will be able to see how much work goes into laminating one of the frames.
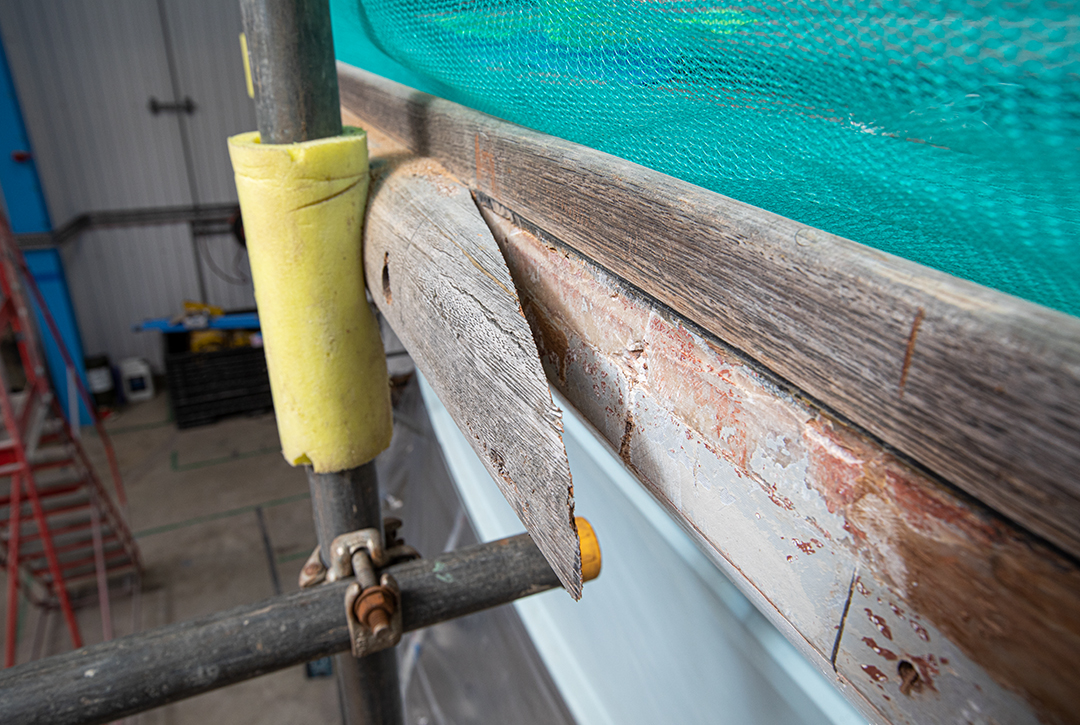
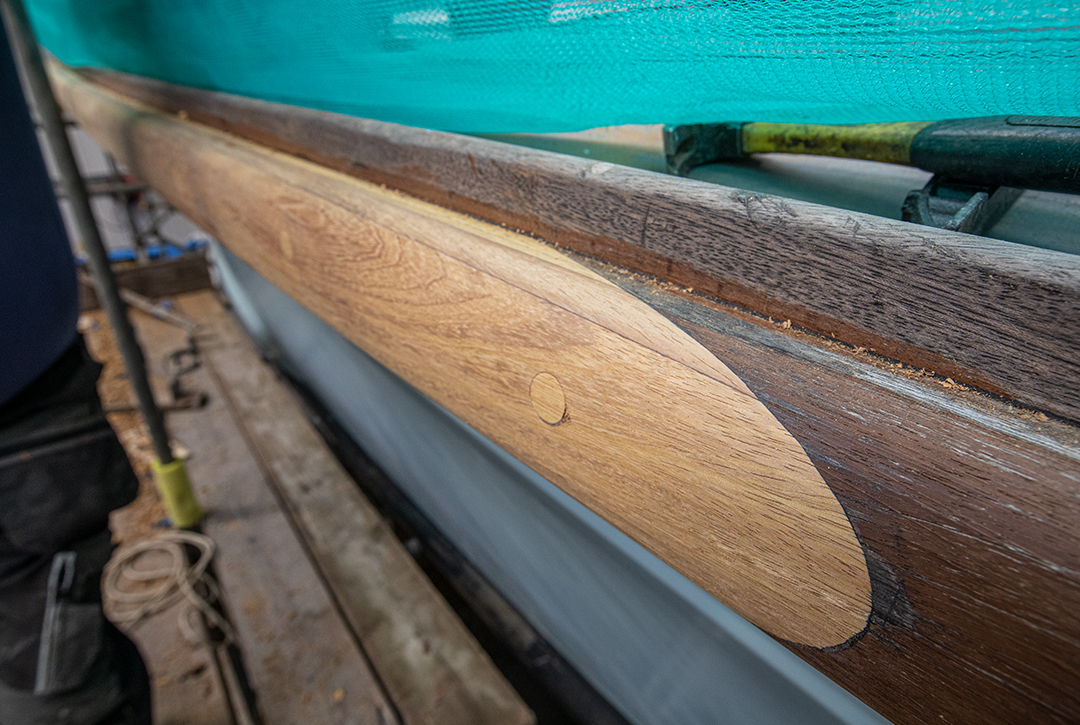
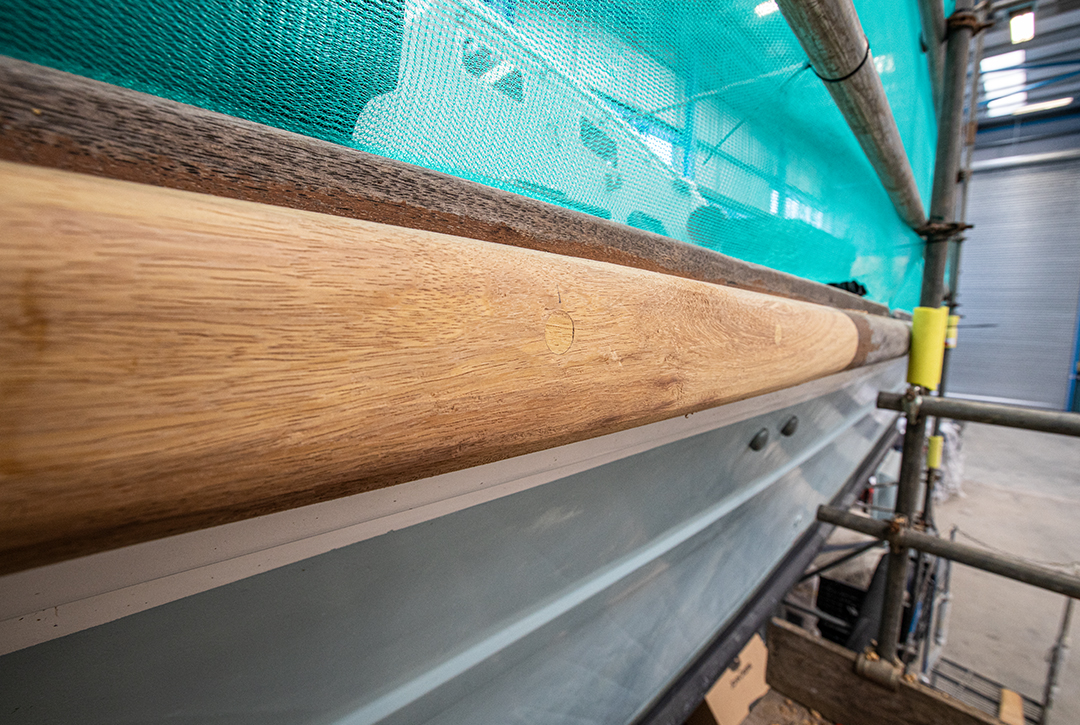
Portside hardwood rub rail
Rub rails cover a boat’s hull-to-deck joint. They are cosmetic in that they generally hide the seam and fasteners connecting these two parts, and though rub rails are no substitute for experienced handling or the proper use of fenders, they do provide protection against abrasion and mild bumps from pilings and bulkheads. Therefore, they wear and eventually need to replacing, especially if the boat lives in a commercial environment.
They were formed in the same way that the hull frames were fashioned, only this time it was a minimal bend in the wood and only 3 layers of iroco. After the glue had set, the rough shape was formed and it was fitted in place, scarph joints were used at either end and fastened with coach screws into the beam shelf internally. It was then planed and sanded down to match the original curve. Within a couple of months of her being outside and back on the water, the new rub rail will discolour to the grey appearance of the older sections at either end of the repair.
Hull
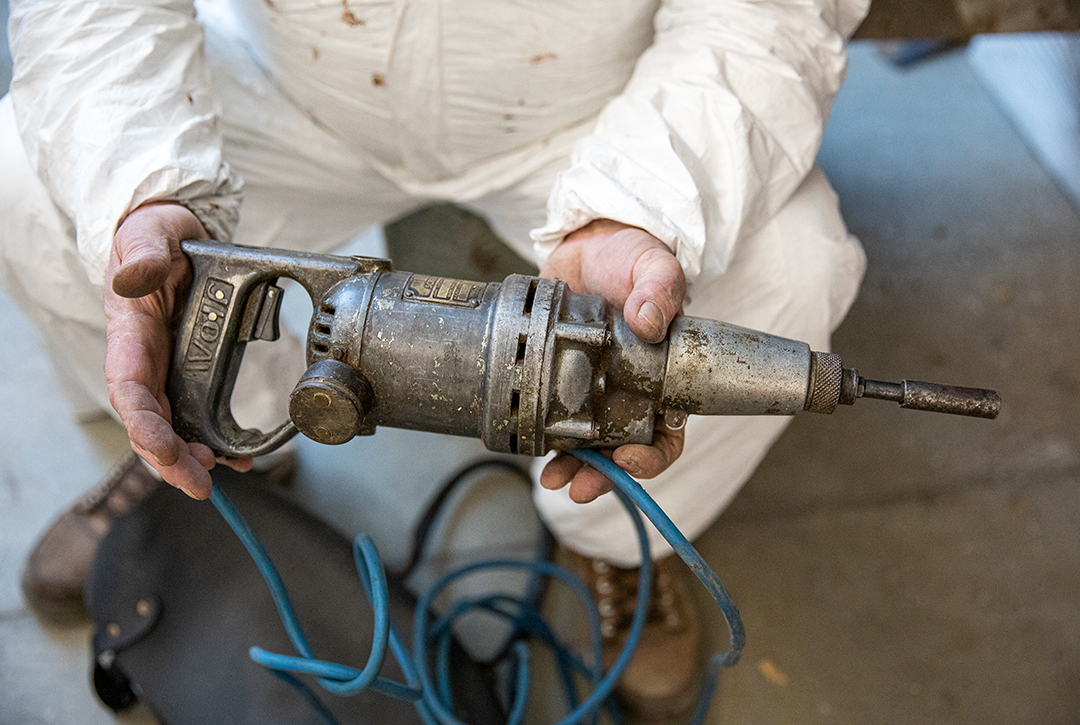
To add strength, countersunk pilot holes were drilled every 8 inches or so and obviously following the line of each frame; subsequently a 3.5 inch silicon bronze screw was secured into each.
The screwdriver machine used to fit the 3.5-inch silicon bronze screws is somewhat special. It was owned by the grandfather of Steve Phillips, a senior Berthon shipwright who worked for British Powerboats in 1940, giving it an incredibly strong chance that this screwdriver machine was used in the original build of MGB 81 back in 1942.
The main reason for resorting back to this equipment is because of how powerful it is.
The drill has to have enough power and torque to drive a screw 3.5 inches long through the 1-inch thick mahogany hull three diag under water and double diag above the waterline, followed by 2.5 inches of the ash and utile beams. For any equipment, this would be tough to drive each screw through. Even though there may be modern tools powerful enough for the job, using the traditional tools and teaching the apprentices with these methods is always preferred.
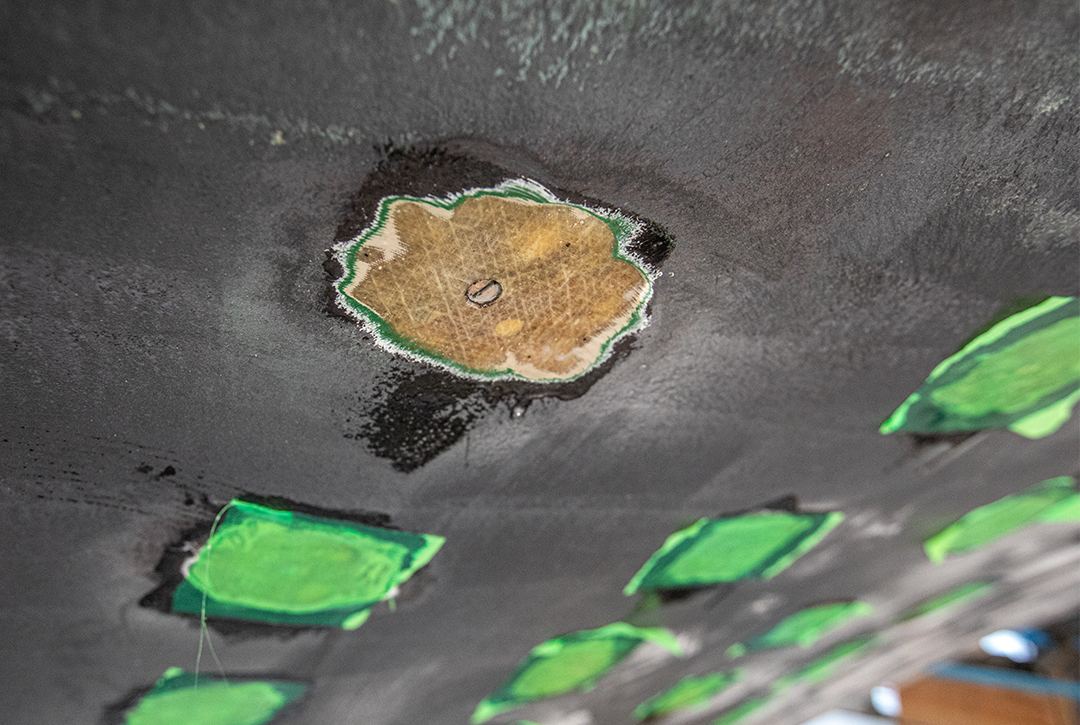
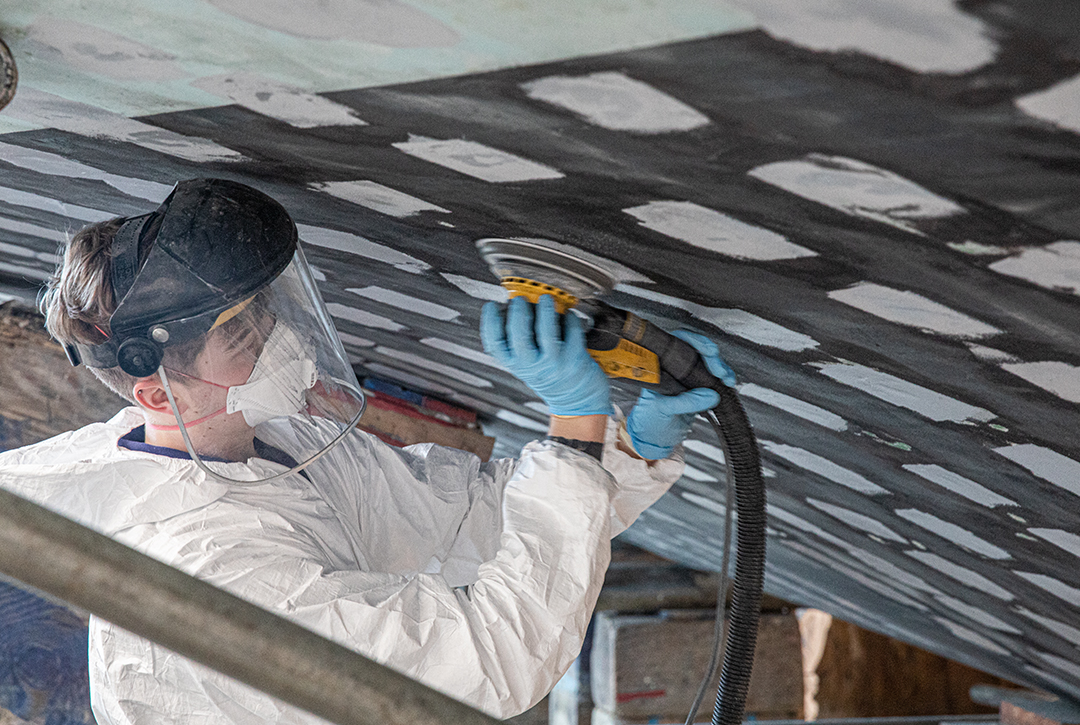
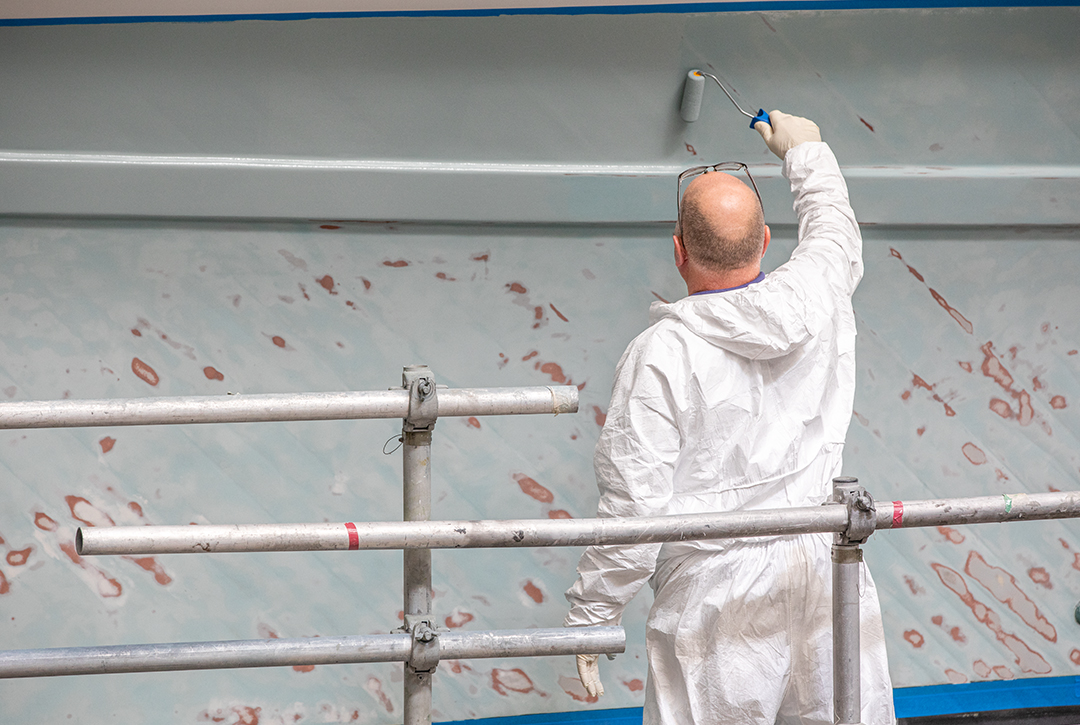
Obviously drilling a few hundred holes in the bottom of a vessel isn’t the best look or great for keeping her watertight; as a result, we sanded back the immediate surface areas, applying three layers of 300g cloth with epoxy resin over each screw head followed by a final layer of (green) peel ply which brings the by-product of epoxy curing – amien – to the surface. As per its name, the green peel ply is detached leaving clean surface for application of filler and/or paint.
After green peel ply has been removed the patches are again sanded smooth ready to accept an epoxy primer and lightly sanded back and primed for the second time before an initial patch of antifoul is added prior to a new coat of antifoul across the whole underwater section just prior to launching.
Transom Repairs
Her aft port corner was damaged which has now been filled and sanded back ready for a coat of primer before we repaint her hull and topsides.
![]()
![]()
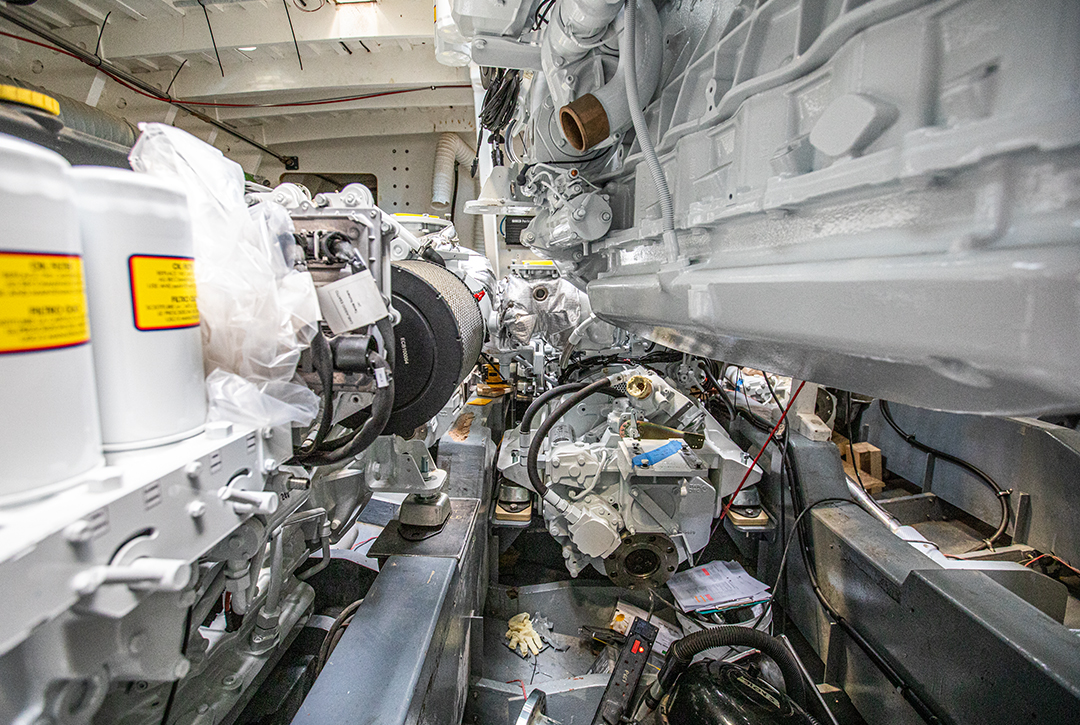
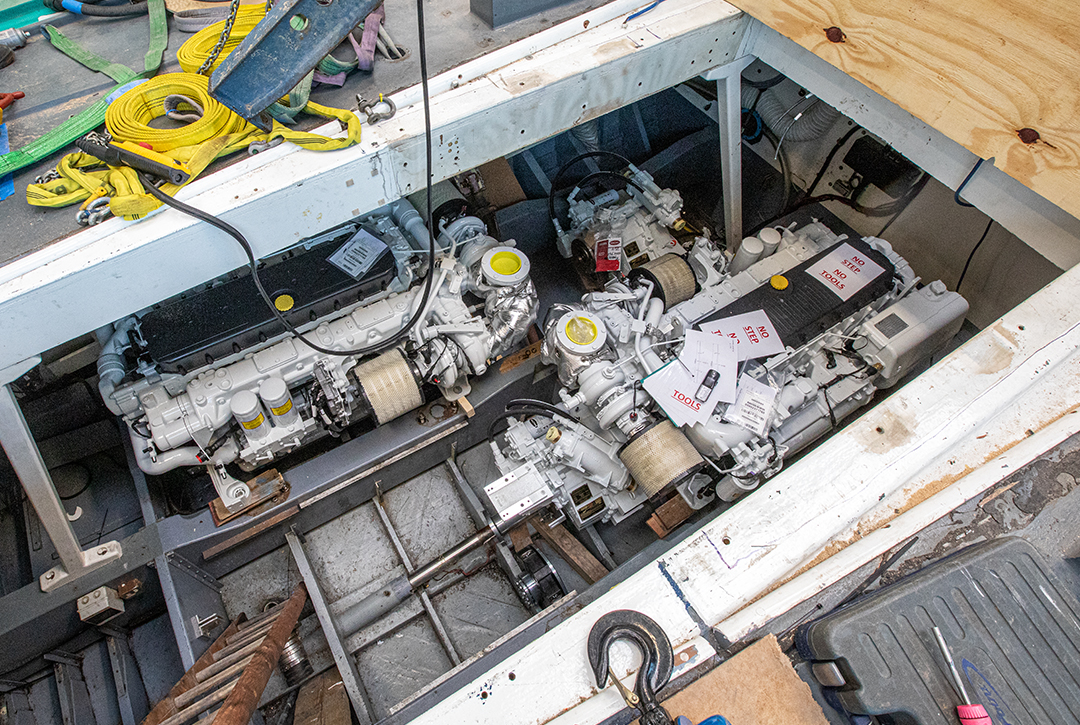
New Engines
Fitting new gearboxes takes place in order to work out the positioning of the new engines prior to the fabrication beds. The engines were mid engine fitted first followed by port then starboard.
Watch the new engines being fitted here
Deckhouse repairs
As ever with rot it is best to deal with it as soon as it appears because moisture will travel creating far greater expenditure in the future. Since this vessel is to be a working museum piece and therefore on the water, it is vital that all rot discovered is eliminated at this stage.
Having cut out the rot, we then glue a section plywood to fit which is laminated over with an epoxy resin. A green peel ply is then laid over, to be removed when dry giving it a cleaner and smoother finish, filled and faired with epoxy, sanded back and primed ready for a new coat of paint along with the rest of her superstructure.
Peel ply is a tough and finely woven nylon fabric treated with a release agent and used to separate the absorber breather and vacuum bag from the epoxied laminate during the vacuum bagging processes but it’s also used in hand lay-up uses to allow more pressure when squeegeeing and to protect the lay-up from contamination.
The fabric sheet is draped over the epoxied surface allowing excess epoxy to bleed through; Once it has dried, the fabric is peeled off the laminate, and what’s left behind is a perfectly smooth surface that’s ready for a quick sanding, or for the next round of epoxy, with no runs, no sagging and especially no low spots.
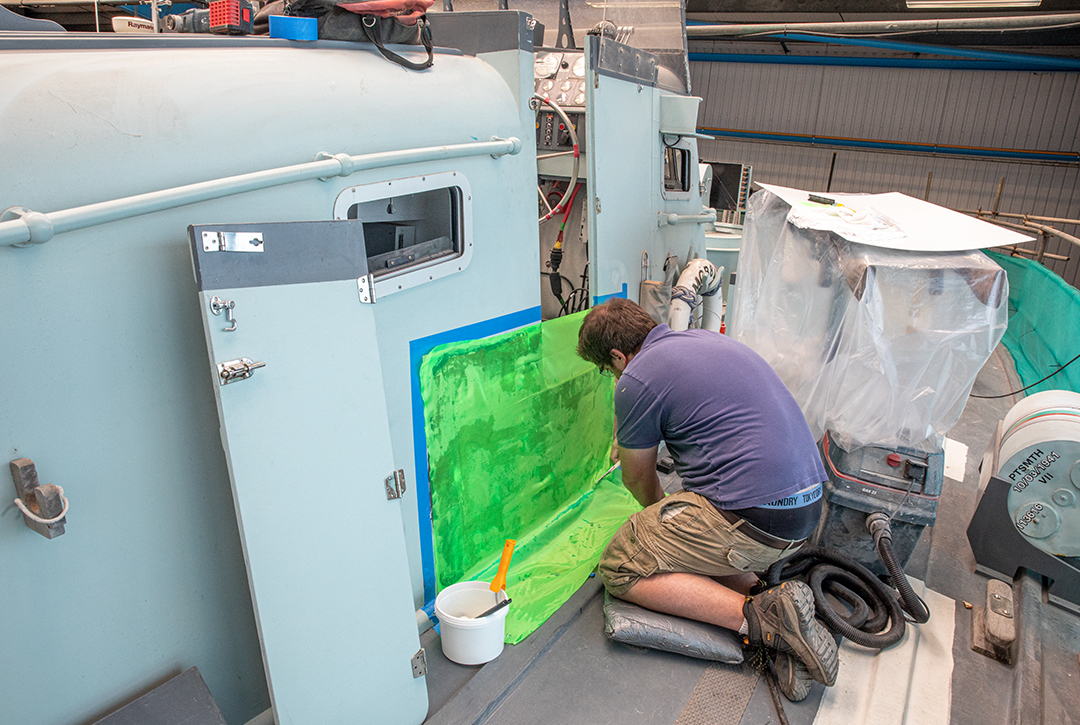
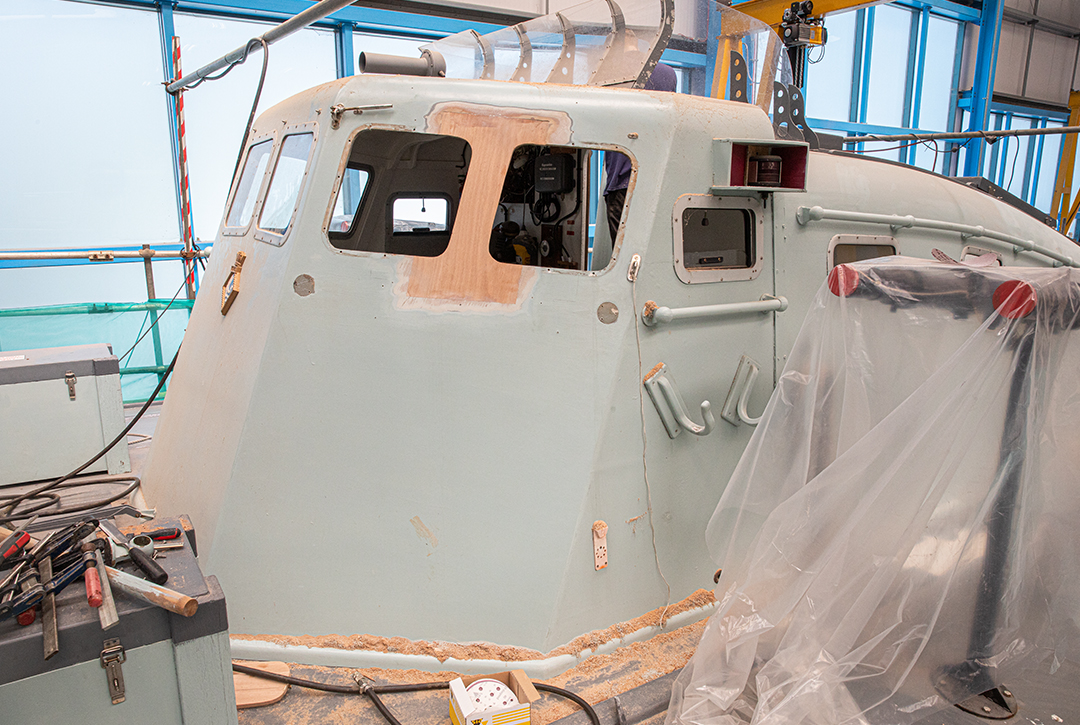
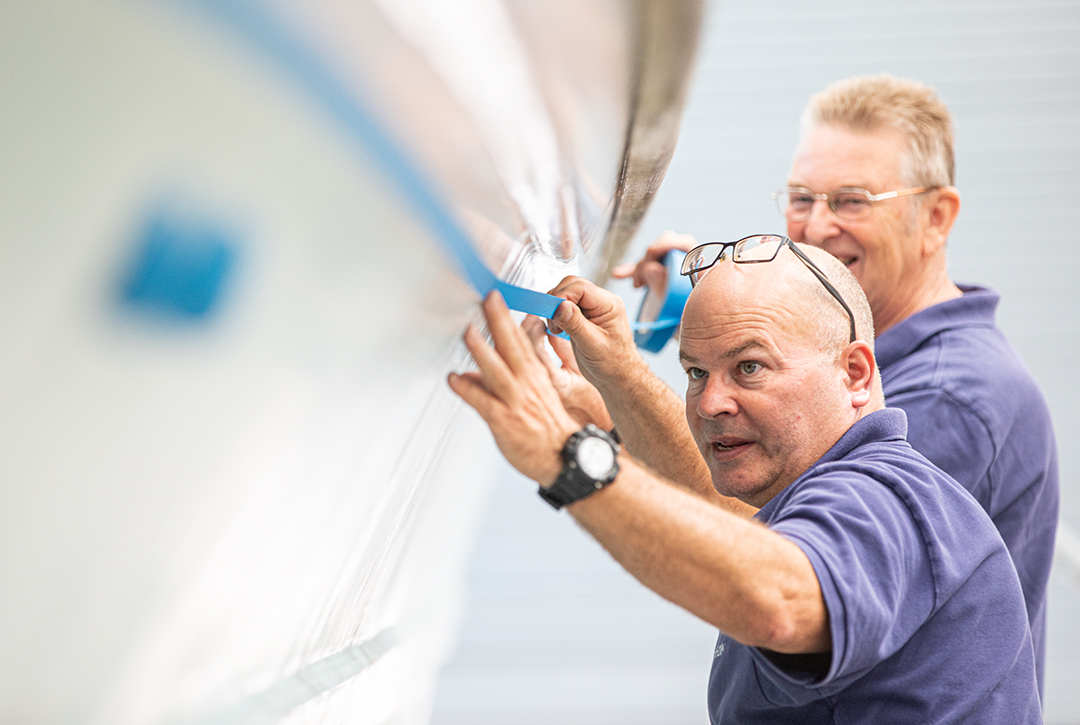
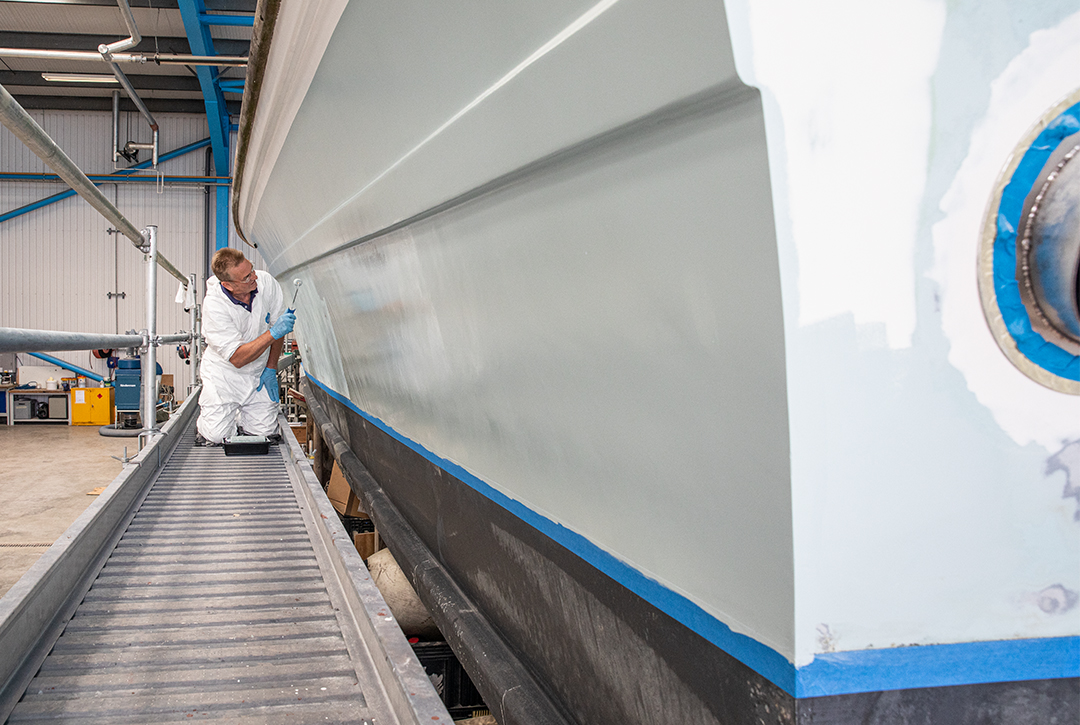
Superstructure Repaint
With the repairs to the deckhouse and superstructure complete we were able to begin sanding her topsides and superstructure with all windows, instruments lights and the horn masked off, waiting for correct temperature to apply the Jotun Conseal, a one component, physically drying acrylic coating with a matt finish. We used the original light admiralty grey for the topsides and superstructure and dark admiralty grey for the decks and top of the superstructure.
It is a high build product, meaning just one or two coatings are needed, high-build coatings also generally have a high resistance to water vapour permeability, better ‘crack-bridging’ capabilities, which guarantees a sufficient coverage of voids and other small surface imperfections which could serve as an entryway for water. It is also durable, attractive and smooth while also being resistant to wear. It is also fast drying which allows for over-coating in a short period of time and can be used directly onto metal, which is especially useful for the gun turrets.
Finally, from a cosmetic perspective this product was selected because it provides an authentic hand applied non-gloss finish to keep the original 1942 feel and look.
Completion
After completion of a comprehensive works list it was time for a sea trial to test the new engines. She performed beautifully and we are delighted to have been part of the project to return her back to her former glory.
2019 gun refresh
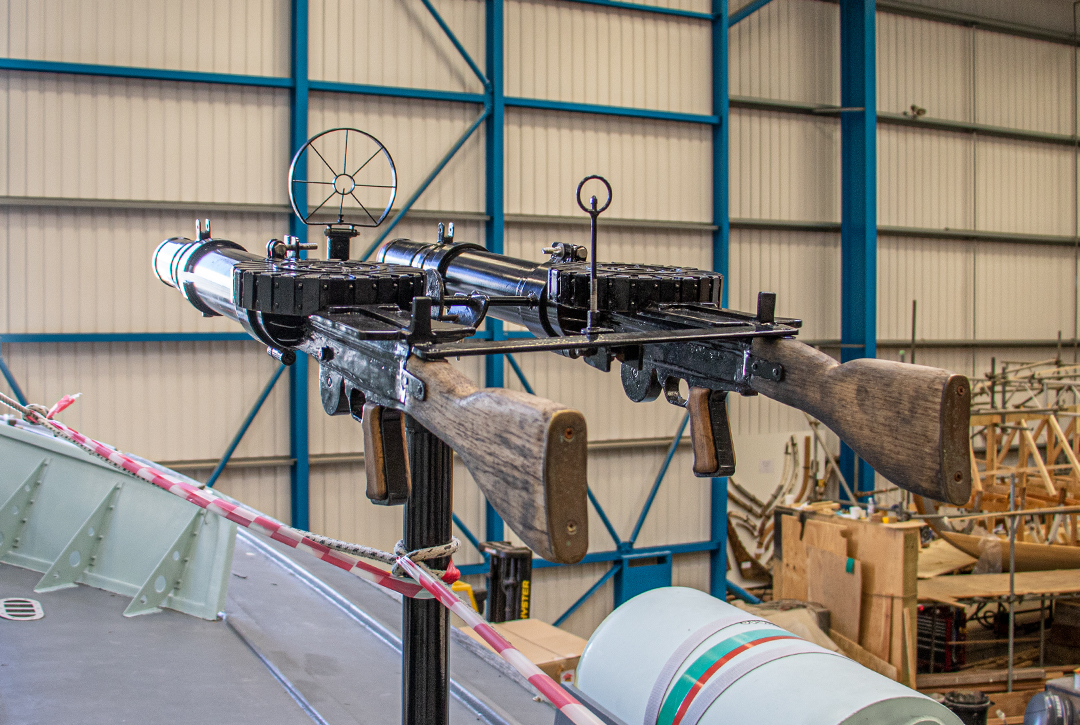
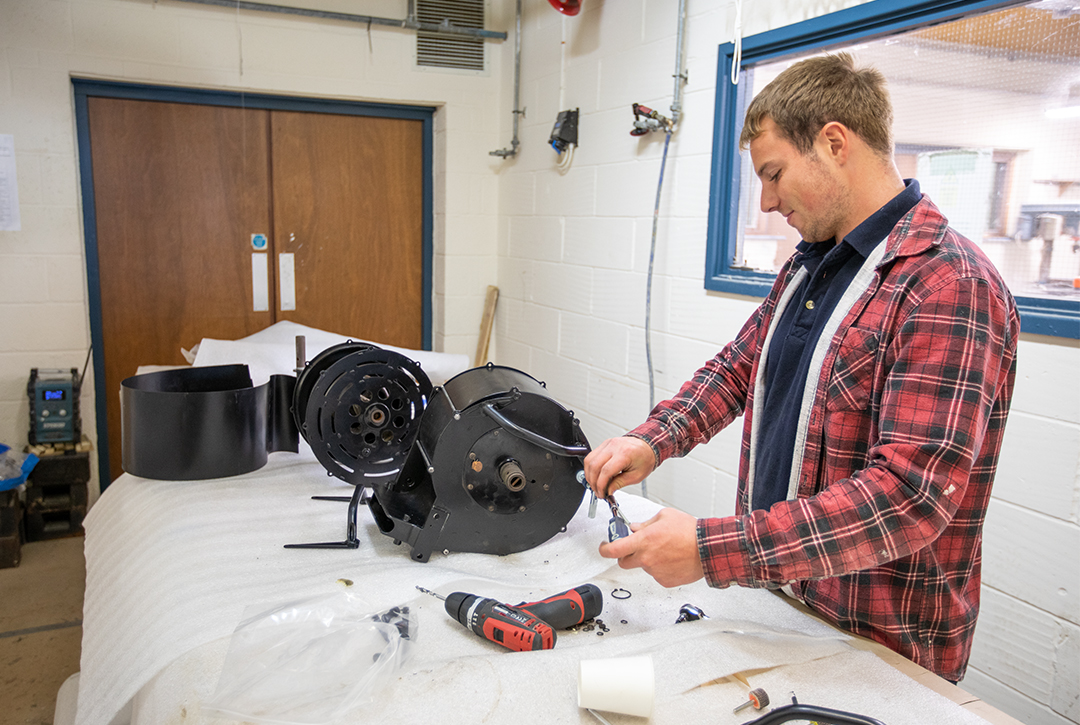
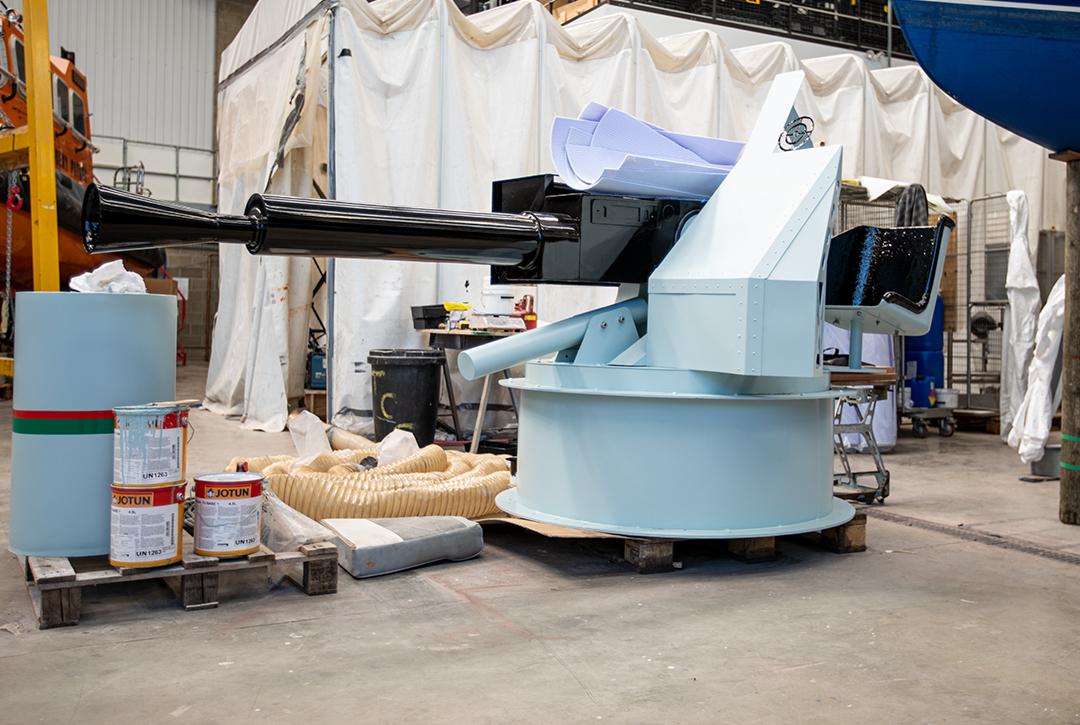
She has 4 guns in total, her main armament being a two-pound semi-automatic (pom pom), mounted on the foredeck, twin 20mm Oerlikons mounted up on the aft superstructure and 2 twin 0.303” Lewis machine guns fitted to rotating pedestals on deck beside the helm, along with multiple 500lb depth charges.
During her previous refit here at Berthon, the majority of the aft 20mm Oerlikons was repainted along with the superstructure, this meant only the magazines had to be painted. The biggest of all the jobs was the two-pound ‘pom pom’. This was unbolted from her fore deck, and due to her size craned off. Once safely on the ground and in our paint preparation shed it was stripped and repainted in the traditional MGB grey with the main gun black. Her twin 0.303” Lewis machine guns were stripped down to the individual components, blasted and powder coated. It’s not every day a shipwright is asked to reassemble WW2 machine guns! On completion, they were craned back on-board and re-attached.
MGB 81 History
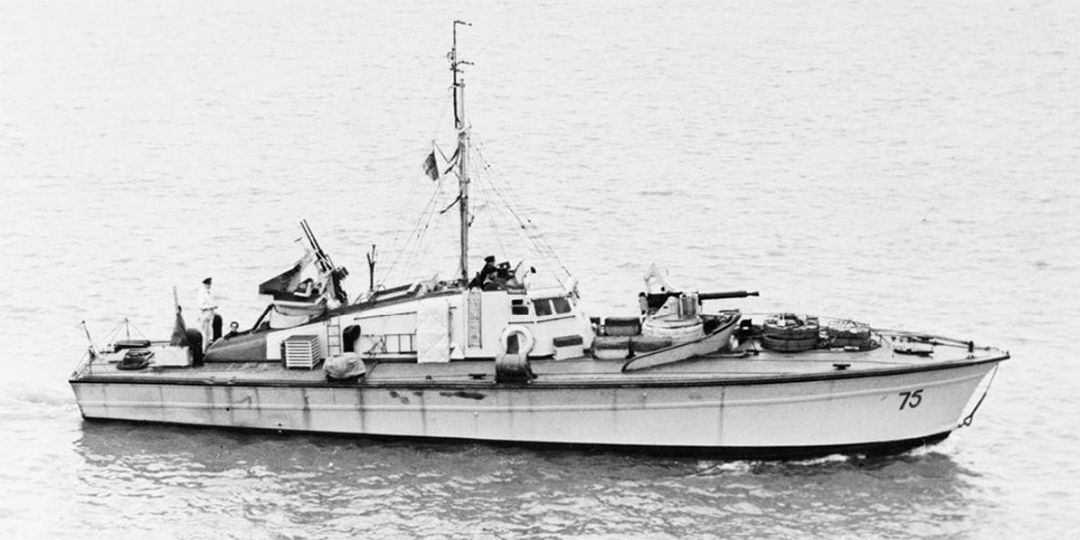
71.5ft British Power Boat MkV MGB 71ft mgb
MGB 81’s design was produced by the British Power Boat Company (BPB) in collaboration with the Admiralty and, in all, 105 of her type were built (including some which were completed as motor torpedo boats). MGB 81 had a chine hull form using double-diagonal mahogany sides and a triple diagonal mahogany bottom. Although ordered on 27 November 1940, MGB 81 was not laid down until 16 December 1941. She was launched on 26 June 1942 and was by then virtually complete, for she was on trials on 8 July and achieved a speed of 38.63 knots on Southampton Water.
She was accepted and commissioned on 11 July 1942 and then worked up at HMS Bee, the coastal forces base at Weymouth, before joining the 8th MGB Flotilla at Dartmouth in August 1942. Between then and September 1943, MGB 81 was involved in six actions.
Off Guernsey on the night of 13/14 August 1942, she engaged in a close-range gun attack on two enemy armed trawlers and one trawler was severely damaged. The next month, the flotilla moved to Felixstowe and MGB 81 was soon in action off the Hook of Holland on 14/15 September, when two enemy motor vessels were damaged by gunfire and four armed trawlers were hit, with no damage to the MGBs.
In action off Holland on 2/3 October, four enemy armed trawlers were engaged, and one of the flotillas, MGB 78 was lost. On 27/28 February 1943, the MGBs fought the escorts of a German convoy off the Hook, resulting in the sinking of MGB 79, and damage to MGB 81 caused by a shell hitting the engine room.
6th MGB Flotilla, 1942
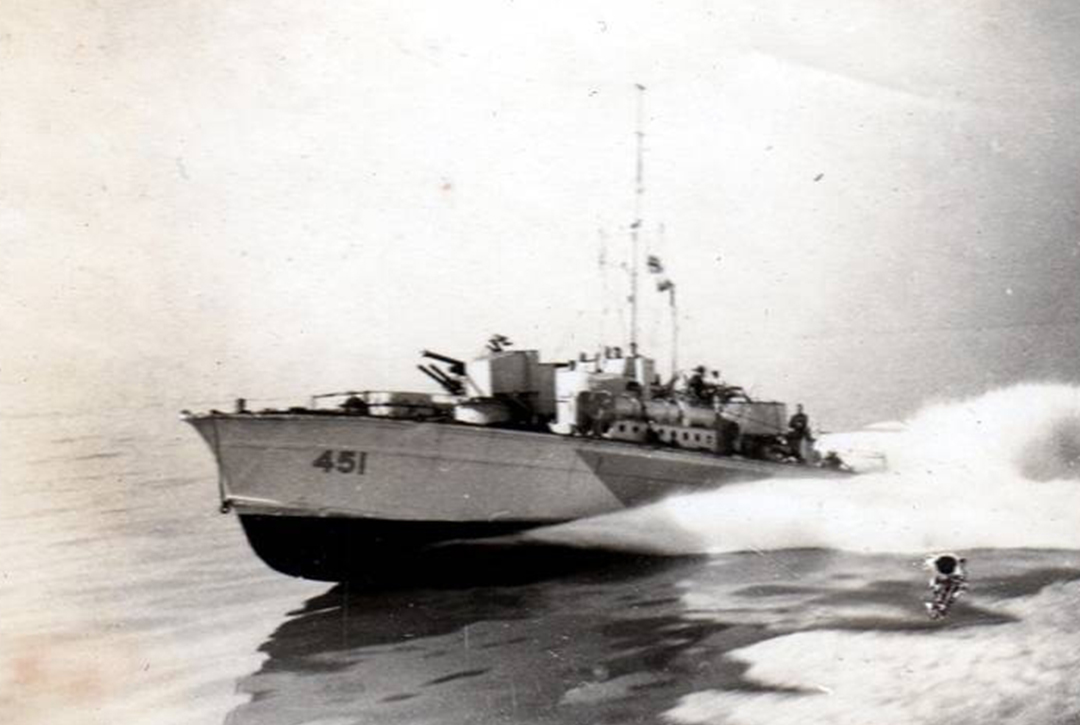
MTB 451 at speed
In April 1943, the flotilla returned to Dartmouth, though MG 81 was refitting at Brightlingsea from 29 April to 20 May. In June 1943, she was damaged in a collision with MGB 115 and was repaired by BPB at Poole. On 11-12 September, she again sustained damage when fired on by shore batteries at Cap la Hague and spent the rest of the month being repaired at BPB’s Poole yard.
In late September 1943, the boat was renumbered MTB 416 and her designated armament was increased to reflect her new role, with the addition of two 18-inch torpedo tubes. Even though they were given the motor torpedo boat (MTB) classification, some of the former MGBs did not ship torpedo tubes, so it is not certain that MTB 416 was so fitted. Her flotilla became the 1st MTB Flotilla and redeployed to Ramsgate for a short period in October 1943 before returning to Dartmouth.
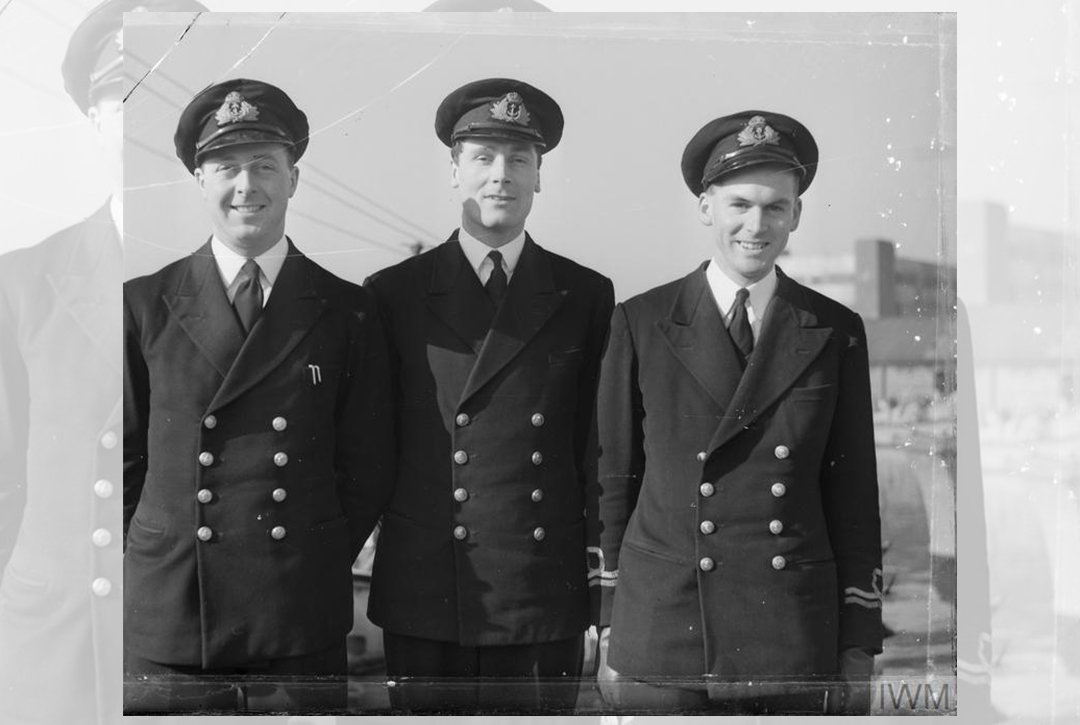
Commanding Officers of Motor Gunboats. Left to right Lieut C A Burk (MGB 17), RCNVR, from Toronto, Lieut J S Price (MGB 20), RNVR, from Blackpool, Lieut C V Dale (MGB 21), RNVR, from Sydney
MTB 416 was refitted at Poole by BPB between 5 January and 2 March 1944. Her first recorded action as an MTB was in Lyme Bay on 21-22 April, when she engaged German E-boats and sustained action damage. Repairs were again made at Poole, but she was back in action for Normandy landings, where she was involved from 6 to 30 June 1944, with Gosport as her base.
On the night of 23/24 June, she was involved in an attack on a German convoy leaving Cherbourg. Although MTB 416 was only backing up this operation, one of her crew was killed.
On the night of 18/19 July, she obtained hits on German R-boats off Cap d’Antifer, but her hull was damaged by gunfire and she returned to Poole again for repairs.
In September 1944, the flotilla’s base changed to Lowestoft and her next action was on 14 February 1945 at Ostend.
On 27 April 1945, with the war in Europe in its final days, she paid off at Poole and was placed in reserve.
Finally, on the 2nd October 1945, she was approved for disposal and was later sold.
Very little is known about her following history until 1958 when she was arrested by Customs officers at Shoreham whilst in a smuggling operation. She was sold on for use as a sailing school accommodation ship at Hardway, Gosport, and renamed JOLLY ROGER. In 1964, she was sold to become the houseboat CRESTA, also at Hardway.
In 1984, she was towed to Burlesdon on the River Hamble, and in 1988, was bought by Guy Webster to restore her to her wartime appearance. On 17 September 1998, she was bought by Philip Clabburn and was reconstructed at the British Military Powerboat Trust’s Marchwood site between 1999 and 2002. Petrol engines were thought to be prohibitively expensive to run, so three 1,000-bhp V-12 MAN turbocharged diesel engines were fitted, giving an estimated top speed of 45 knots.
Since late 2009, MGB 81 has been based at Portsmouth, following her acquisition by the Portsmouth Naval Base Property Trust.
Source: Paul Brown, Historic Ships The Survivors (Amberley, 2010), updated Mar 2011.
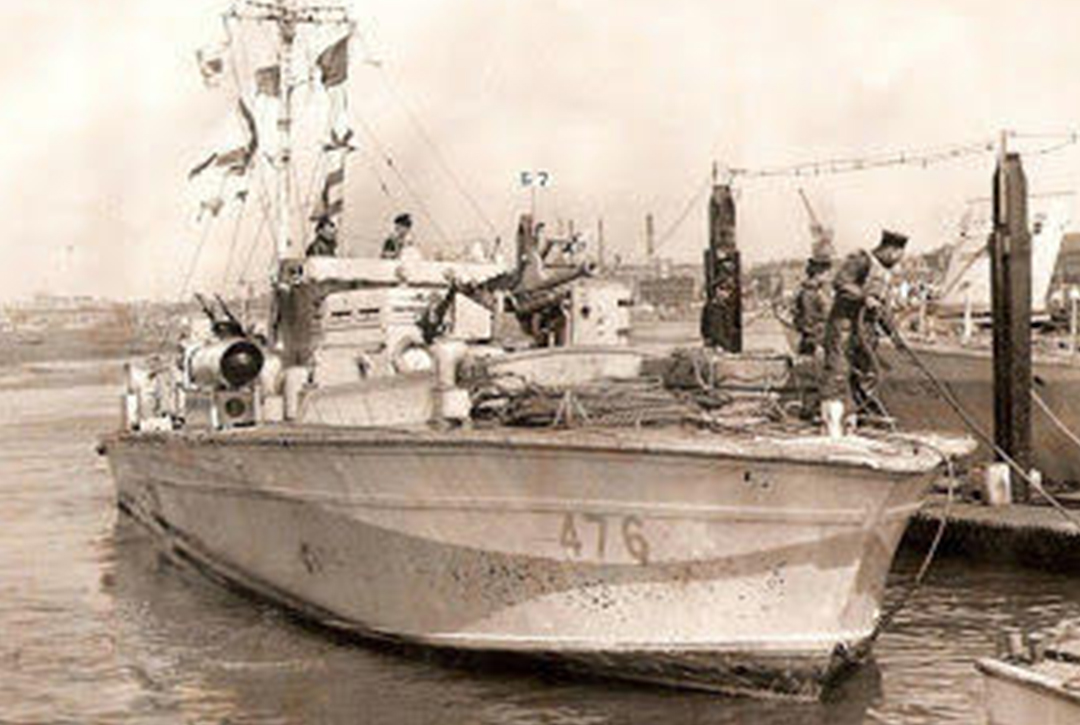
Sister ship 476 at HMS hornet 1943
MTB 451 in the sights of 450
Key Dates
- 1942 – Built by the British Power Boat Co. as a Motor Gunboat
- 1942 – After extensive trials, joined the 8th MGB Flotilla at Dartmouth
- 1942 – Close range gun attack on two German armed trawlers off Guernsey
- 1943 – After escorting minelayers, contacted a German convoy north of the Hook and engaged the escorts
- 1943 – The 8th Flotilla again moved to Dartmouth and the vessel was refitted at Brightlingsea
- 1943 – Damaged in a collision with MGB 115 and repairs carried out at BPB Poole. Later damaged in an engagement off Cap de La Hague and again repaired at BPB Poole
- 1943 – Re-designated MTB 416 with two 18 inch torpedo tubes
- 1944 – Refit at BPB Poole after which she vectored onto and engaged five E-Boats in Lyme Bay, suffering damage
- 1944 – Took part in the D-Day landings and later attacked a German convoy leaving Cherbourg, during which an AB was killed
- 1944 – Attacked enemy R-Boats off Cap d’Antifer in which the CO was wounded and the vessel damaged. Further repairs at BPB Poole followed by further action
- 1945 – Approved to lay up in Category “C” Reserve at Poole, followed by final paying off
- 1945 – Bought by Mr J Evans
- 1958 – Arrested by HM Customs for smuggling and subsequently sold to a Gosport scrap dealer and used as an accommodation barge by a sailing school in Gosport under the name JOLLY ROGER
- 1964 – Bought by Mr John Ould and fitted out as a houseboat named CRESTA
- 1980 – Bought by Mr John Coker
- 1984 – Bought by Mr John Pepperell and towed to a mooring on the River Hamble at Bursledon
- 1988 – Bought by Mr Guy Webster for restoration to her wartime appearance
- 1988-1992 – Restoration work carried out
- 1990s – Moved from her mooring at Bursledon to Crableck Marina, still on the River Hamble
- 1998 – Bought by Mr Philip Clabburn for the British Military Power Boat Trust and lifted out of the water at Marchwood Military Port
- 1999-2002 – Restored to original condition and fitted with three 1000hp MAN diesel engines
- 2010 – Completed vessel bought for exhibition and display, based at the Portsmouth Historic Dockyard
- 2017-2018 – Refitted by Berthon Boat Company
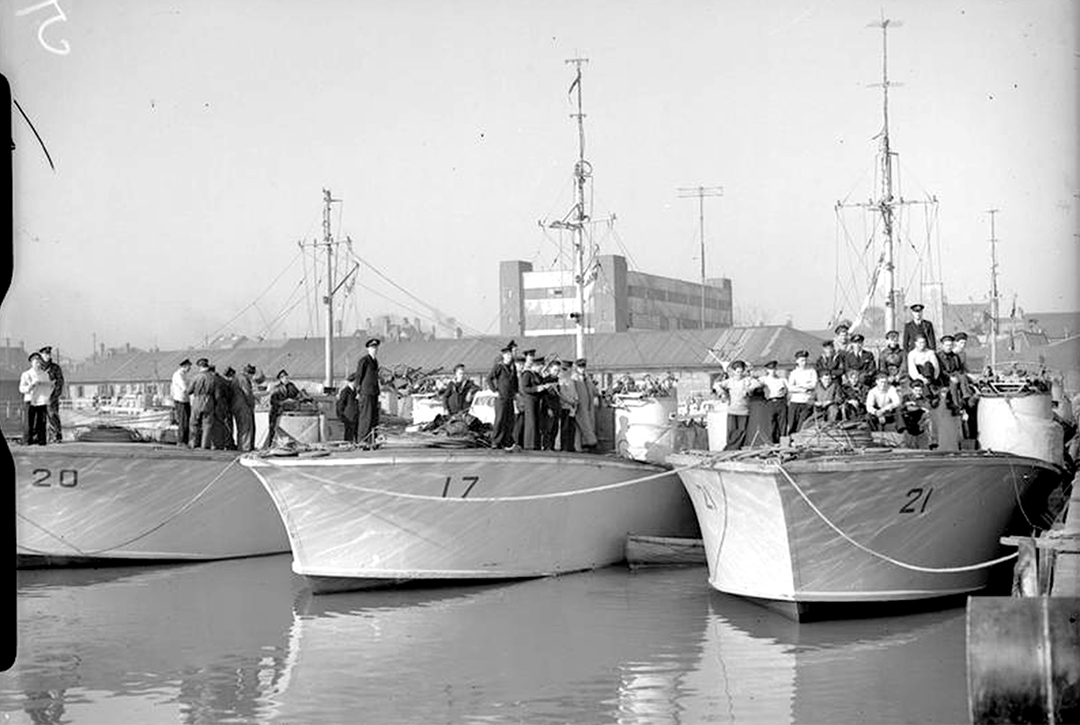
Motor gunboats MGB 17, MGB 20 and MGB 21, docked after their victory in the early hours of 8 March 1943